


Hello and welcome back to the third part of the Understanding ServiceNow blog series. We are well into Now-ember and it is time to cover up in the cold and embrace the new season of the year. In the previous part of the blog series, we covered a few basics of ServiceNow including how one can get started and navigate across the Now Platform.
In this part, we will be looking at a specific application in ServiceNow called the Integration Hub.
What is the Integration Hub
The Integration Hub is used to automate tasks and processes in ServiceNow. This can be done using the Flow Designer or by creating custom integrations. These integrations are reusable and act as units of no-code transformation logic that can be applied anywhere, to any application/table, present in the Now Platform. These integrations can also be with third party systems that can be called from Integration Hub with the help of external APIs. These APIs can be custom designed using the Action Designer Step in Integration Hub.
The volume of data is also controlled using Data Stream actions which are actions but allow data greater than 10MB to be parsed. With listener events that have pagination abilities, the inbound as well as outbound activity to-and-fro ServiceNow offers a variety of customizations.
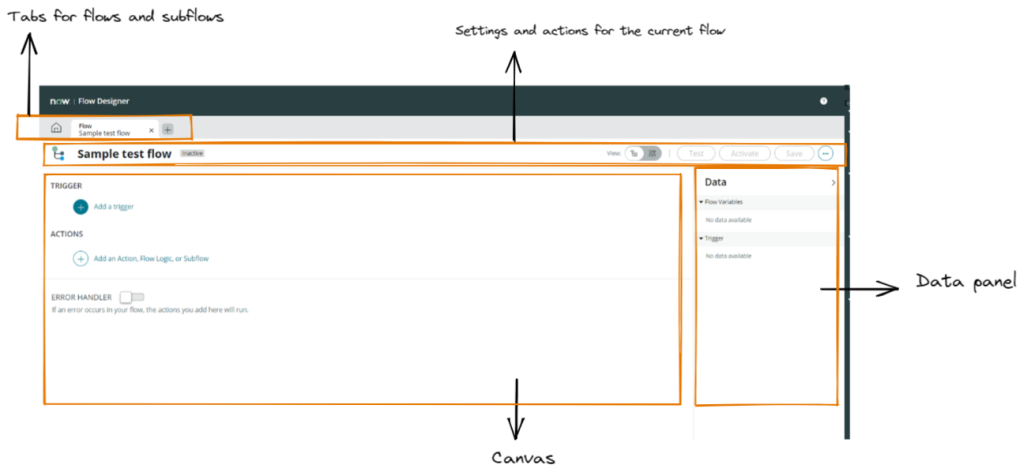
Flow Designer Components
With the help of the flow designer you can automate processes in a particular instance.
A flow in ServiceNow is a set of actions that are executed sequentially. A flow would consist of actions and triggers.
A Subflow is like a reusable flow that is triggered from another flow, script or another subflow. These help with modularity when the flow is very complex. In this way, a piece of logic can be independently managed and treated with more customization when adding automation logic. This added customization comes with the ability to add specific inputs or outputs during a transformation process in relation with the parent flow.
A Trigger in a flow is what defines when a flow is put into execution. These triggers could be of different types. You could have a record trigger, for instance every time a record is updated, the flow would start getting executed. Alternatively, you could also have a date trigger or an application trigger.
Actions define the work performed by a flow. These actions could be built-in or custom designed. When the flow is running, the initial actions generate output values that eventually become input data for the actions that come later in the flow.
Licensing for the Integration Hub
Integration Hub licensing is done subscription-wise in ServiceNow.
The free subscription to the Integration Hub is the Integration Hub Starter. To get access to the data stream actions you would require the ServiceNow Integration Hub Enterprise Pack Installer. These installers are plug-ins that can be requested through the ServiceNow Marketplace.
Let’s Build a simple Flow
We will be creating a flow using the Flow Designer to get an approval on an issue.
Pre-requisites
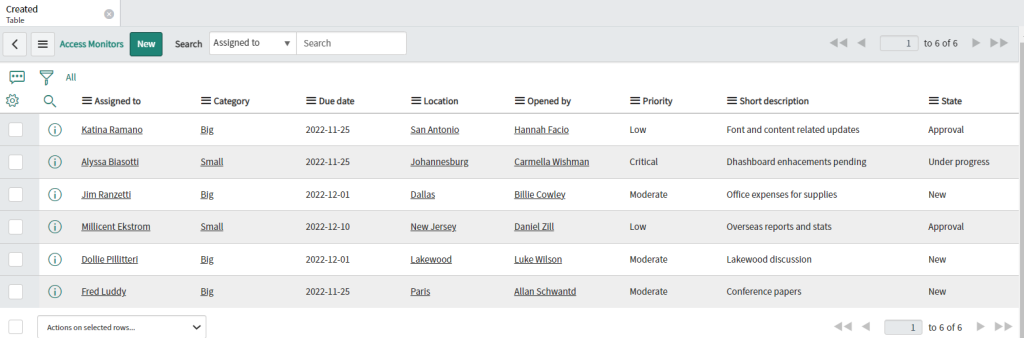
To exercise our flow on a table, we will need to create a table. You can create it anywhere – on the App Engine Studio or on the System Applications Studio. The table that we will be using is named as Access Monitor.
The fields required for the table are as follows:
| Column Label | Type | More Details |
| Category | Choice | Choice List Specification: Dropdown without — (must specify a default value) ———— Choice Label: Choice Value Big : big Small : small ———— |
| Due Date | Date | |
| Location | Reference | Reference: Location [cmn_location] |
| Opened By | Reference | Reference: User [sys_user] |
| Priority | Choice | Choice List Specification: Dropdown without —None— (must specify a default value) ———— Choice Label: Choice Value Critical: critical Moderate: moderate Low: low ———— |
| Short Description | String | Max length: 40 |
| State | Choice | Choice List Specification: Dropdown without —None— (must specify a default value) ———— Choice Label: Choice Value Approval: approval Completed: completed New: new Under Progress: under progress ———— |
Your table should look something like this in list view:
Step 1: Creating a new Flow
💡 The roles required to operate the flow designer are admin, flow_designer or delegated_developer with granted access to Flow designer in the developer permissions for the created app. Make sure you have one of these roles.
First we will navigate to the Flow designer. Go to Application Navigator> Flow Designer.
On the Flow Designer, create a new flow. Next, you will be prompted to enter the flow designer properties as shown below.
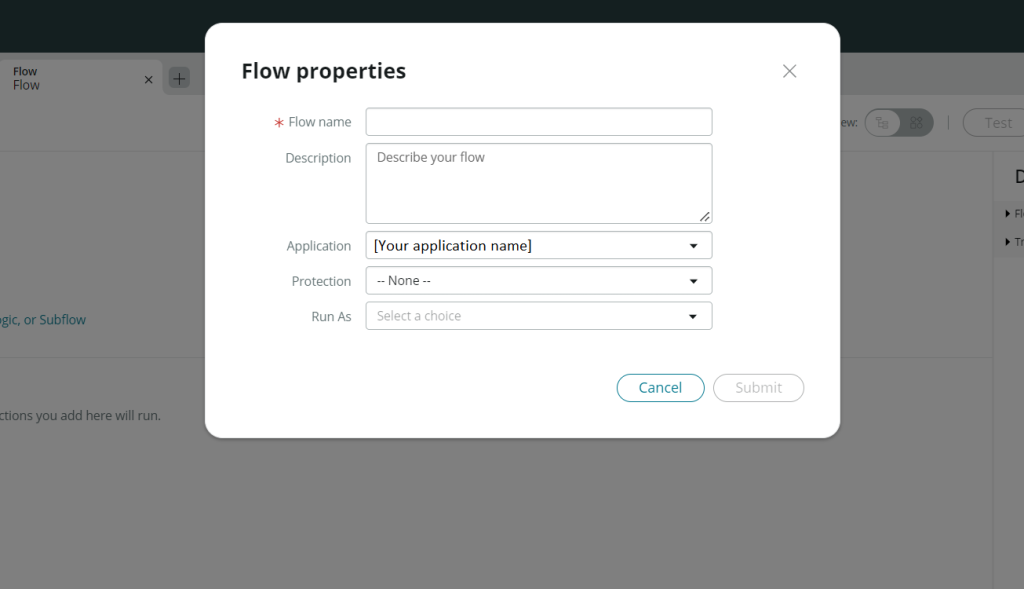
Flow name : Issue Approvals
Description : This flow will be used to update the states based on approvals for the Access Monitor.
Protection : (optional)
Run as : System User
Click on submit.
Step 2: Setting a trigger
We want to run this flow whenever a record is updated on the Access Monitor Table on the condition that the State for the newly updated record is in Approval.
For configuring the trigger, we start by selecting the Updated option as shown in the image below.
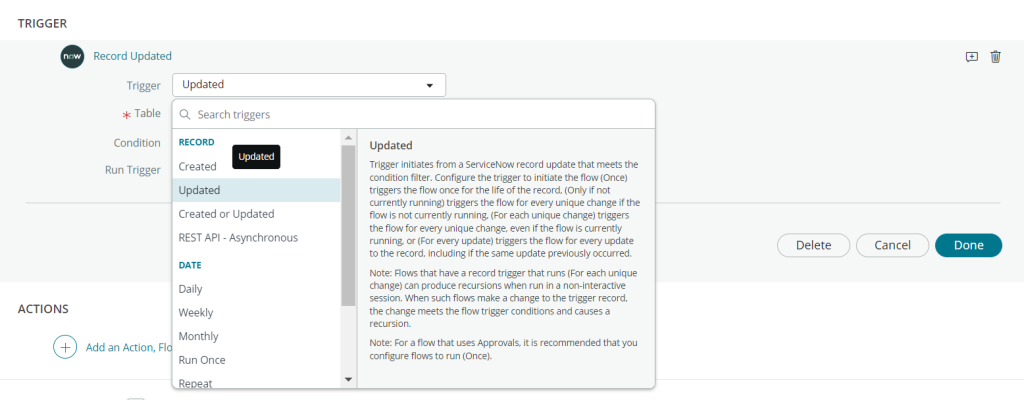
Next, we will be selecting our table from the dropdown and adding in our condition under Advanced Options. Your trigger should look something like this:

The criteria for the flow to be triggered may not always be met. Sometimes, it may also get rejected if the state is not in approval. For this reason, we set the value of the Run Trigger as Only if not currently running.
Click Done after configuring.
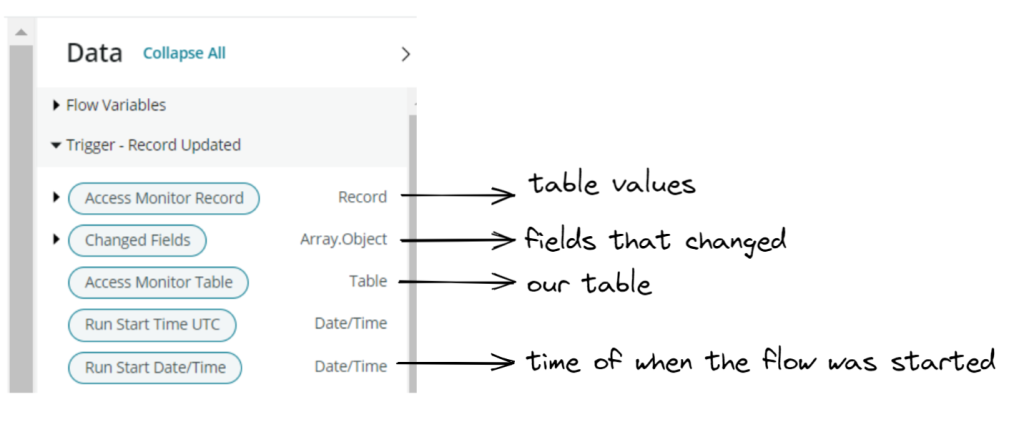
Step 3: Observe Data pills
If you look at the Data panel of our flow now, you will notice that some values are present under the Trigger header. These values are called data pills. They act as dynamic data that will be utilized by our actions.
Step 4: Configuring an action
After configuring the trigger for the flow, we will be adding some actions which will be carried out if the condition of the trigger is met. The first action that we add is a request for approval. The person who is responsible for opening the issue (maintained in the Opened By field in the Access Monitor table) will have to approve/reject the issue.
To implement this, we click on the plus button for Action. Go into ServiceNow core and select Ask for Approval.

On selecting this, a form should appear on your screen for configuring the action. Drag and drop the Access Monitor record data pill into the Record field in the form. We will also configure our rules for this action with the help of the data pill picker as shown below.
Click done after configuring the action.
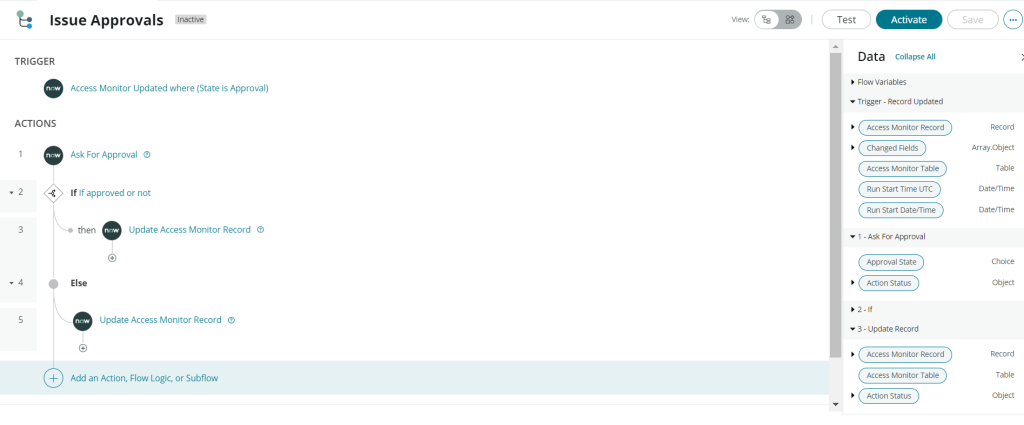
Step 5: Creating an If/Else block logic
Next, we will be adding some steps on what tasks would have to be performed after the approval is requested for. When the approval request is sent and the person has approved the issue, we would want to update the State field in our Access Monitor to ‘Completed’. If the approval has been rejected, the State field should be set as ‘Under Progress’ so that the record can go back into the technician’s queue for a follow-up.
For this we will be adding an if/else block which should function like this:
if approval state = approved
Update record 'state' field to 'completed'
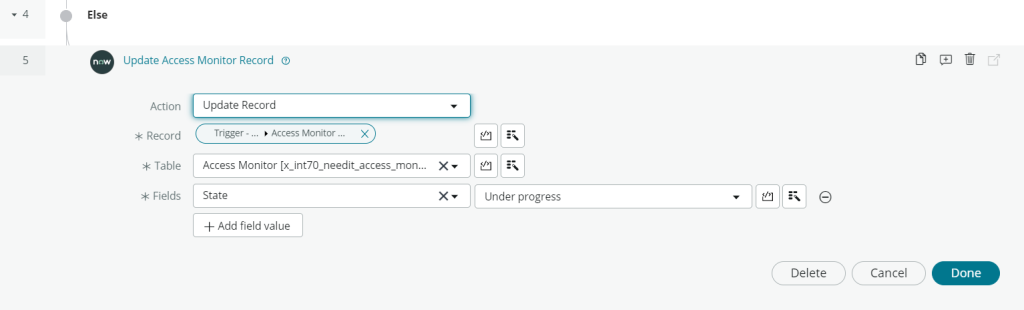
else
Update record 'state' field to 'under progress'
Configure the if condition as shown below.
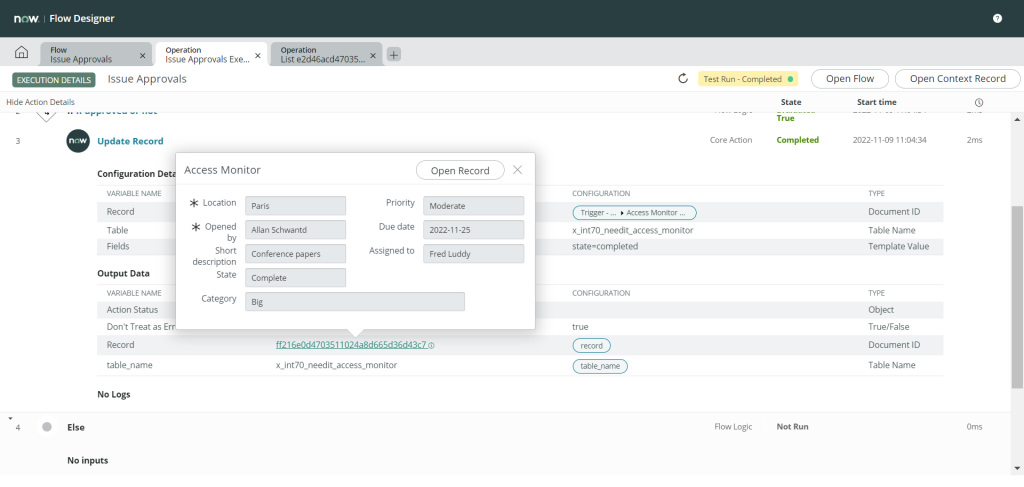
In the branch of the If block, we will be performing the Update operation which should be configured as shown below:
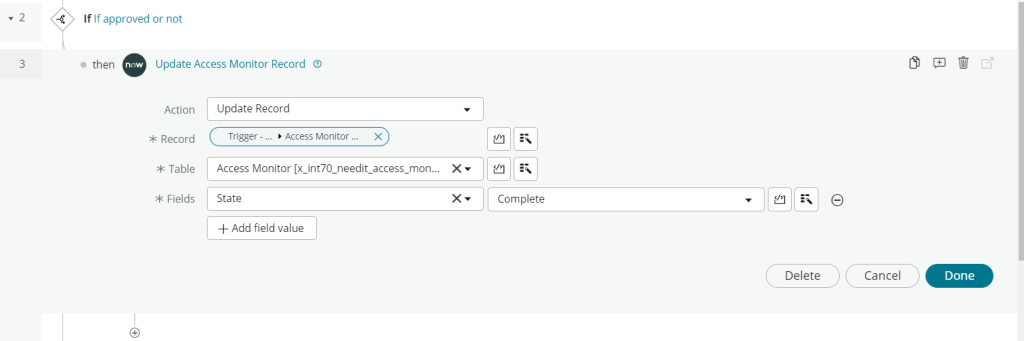
You can use the Access Monitor data pill(as discussed in Step 3) for the Record field in this form. Click Done.
Next, we will be adding in our Else block and its following Update action.
For the Else block, click on the plus icon outside the If block > Select Flow Logic > Select Else option from the dropdown. Under the else block, create a new Update action and configure it as shown below.
Step 6: Testing our Flow
Our final flow should look like this:
To test the flow, click on the Test button on the upper right side of the canvas. You should be prompted with a window as shown below:
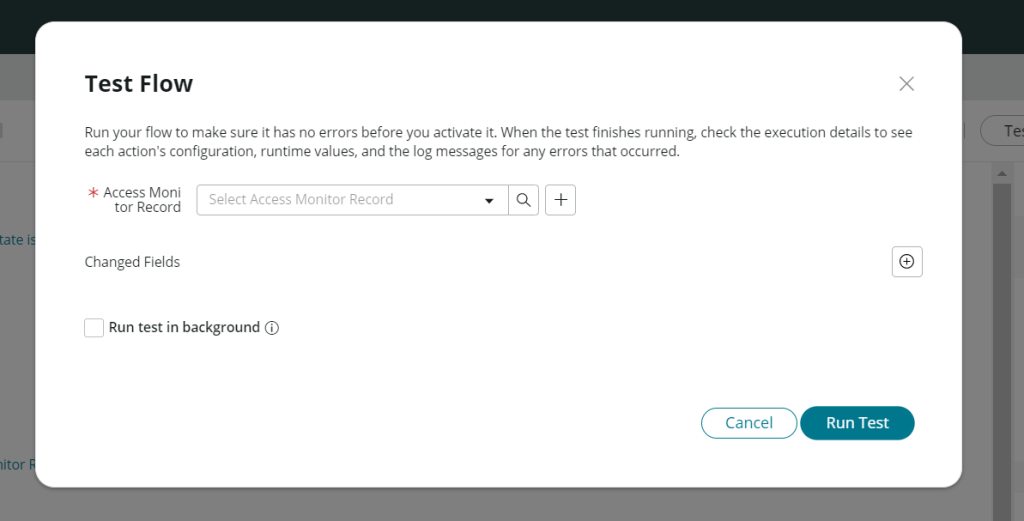
The Test feature on the Flow Designer bypasses the trigger condition of the flow and allows us to test out the flow logic for a specific record in our table. The test execution runtime fields can also be modified to suit your requirements.
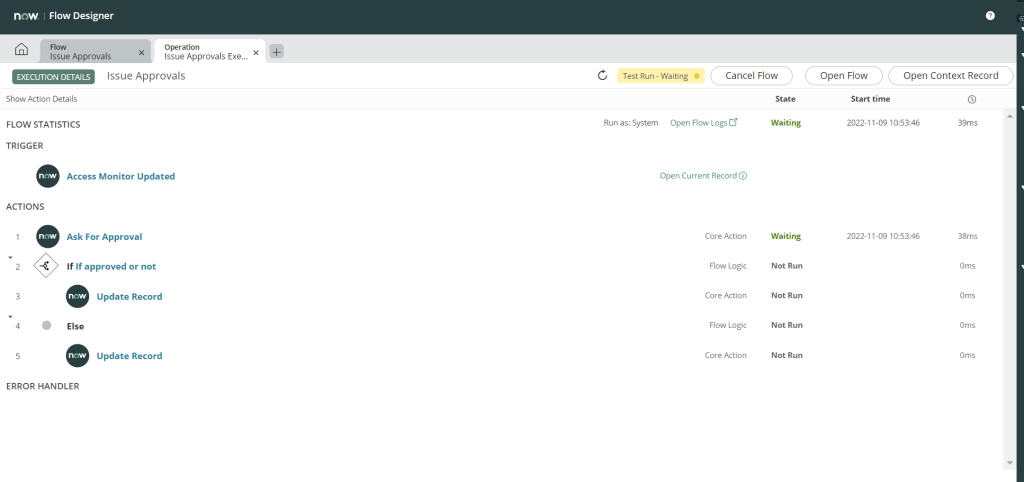
Once the Test execution has finished, the execution logs are displayed as shown below:
We would now, have to approve the request or reject it. This can be done by navigating to All > Self-service> My Approvals (accessible for the user who created the issue only).
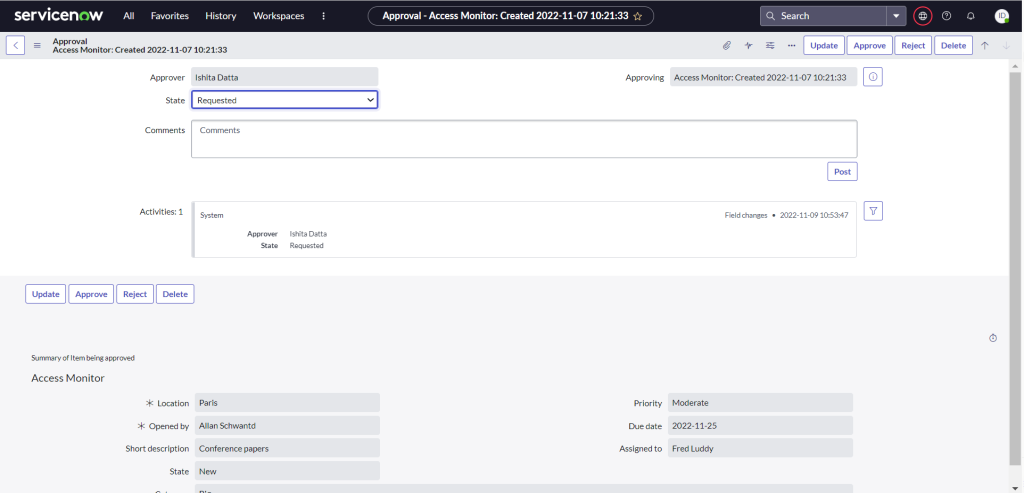
On clicking the Approve button, approval state will change to Approved as shown below.

If you now go back to the flow execution, and refresh the results, the Test run will not be Completed.
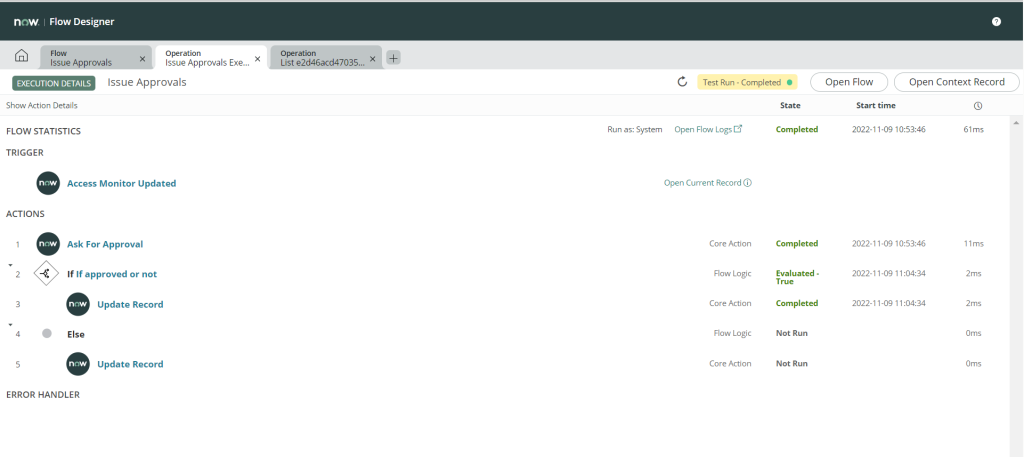
The record state value also gets updated to ‘Completed’.
Conclusion
Congratulations on building your first flow on the Flow Designer! The flow designer is one of the most useful components of the Integration Hub. You can perform multiple transformations, trigger notifications, send emails with the help of Flows. These flows can also be used with third-party APIs. They turn workflow management into a completely automated process, thereby making manual intervention necessary only for tracking and monitoring purposes.
In our next and final blog of this series, we will be looking at connecting our instance to these third party APIs and making use of more features that the Integration Hub has to offer. Till then enjoy the snow as Now, winter has come. ❄️