


Would you accept it, If I say I would provide you with an analytical update about a very important metric for stock purchase only after you refresh the data manually ?
No, right! because by the time you receive the information, It would already be too late.
In the current world, the need of the hour is to consume information in real-time. Luckily, to support this need there is a protocol supported by all modern browsers to allow direct data exchange: WebSockets.
What are WebSockets?
WebSocket is a full-duplex protocol used in the client-server communication scenario.
In simple words, it is what enables the application you are using to receive the data without requesting it from the server, a two-way communication.
Unlike HTTP it starts from ws:// or wss://. It is a stateful protocol, which means the connection between client and server will keep alive until it is terminated by either party (client or server).
Why WebSockets?
We know WebSocket provides a mechanism to have two-way communication, but there are a few more reasons why we should prefer it:
- It allows two-way communication.
- Data is sent and received much faster than HTTP, faster than AJAX too.
- Compatibility between platforms (web, desktop, mobile).
- HTTP has a 2000-byte overhead, but WebSocket only has a 2-byte cost.
- WebSockets supports multiple data types.
Use cases
Let’s look at the most common use cases and where we generally encounter them:
- Social Feeds like Twitter, LinkedIn
- Multiplayer game
- Collaborative editing/coding
- Chat application and more.
Now we know what are WebSockets, why we prefer them, and some of their general use-cases. Let’s also take a look at how we can make use of it in the SAP world and how they’re already being used.
An application like SAP Fiori Launchpad can consume notifications from the SAP Gateway Notification Channel. The notifications and alerts will be visible automatically whenever there is any update. The launchpad disables notifications by default, and no notification-related UI elements are visible to the user. You can refer here ↗️ in case you want to enable the notifications.
Let us look into some use cases where we can utilize WebSockets to make our Fiori applications more efficient and attractive:
- Real-time content for apps like my inbox, my leave requests, and approve leave requests.
- Data consistency across multiple users
- Real-time view rendering based on data
- Custom notifications and alerts
- Better analytics like progress indicators and live charts
A simple application with WebSocket
Before starting any further on how to create WebSocket in ABAP, let us first look into some nitty-gritty of it in SAP.
Understanding ABAP Channel
In simple terms, ABAP Channel provides event-based communication using messages between ABAP Server and the internet.
It consists of two main enabling technology which helps in the pushing of messages from the server to UI and the exchange of message between different user session in AS ABAP. Let’s look further into it.

ABAP Push Channel
ABAP Push Channels(APC) is a technology using which a full-duplex or two-way communication with the server can be realized. It is called a push channel to emphasize that the technology allows the pushing of messages to the client even if a request is not sent.
ABAP Messaging Channels
ABAP Messaging Channels(AMC) is a technology that enables the communication between ABAP sessions using messages in an AS ABAP.
Messaging Channel is also known as publish/subscribe infrastructure.
Messaging channel along with Push Channel is required for scenarios like collaboration as shown in the diagram above.
Now that we have a basic understanding of ABAP Channels, let’s look into how we can create a simple WebSocket in ABAP
Prerequisites:
SAP NetWeaver AS ABAP 7.40 Support Package 5(SP5)
Creating a Simple WebSocket
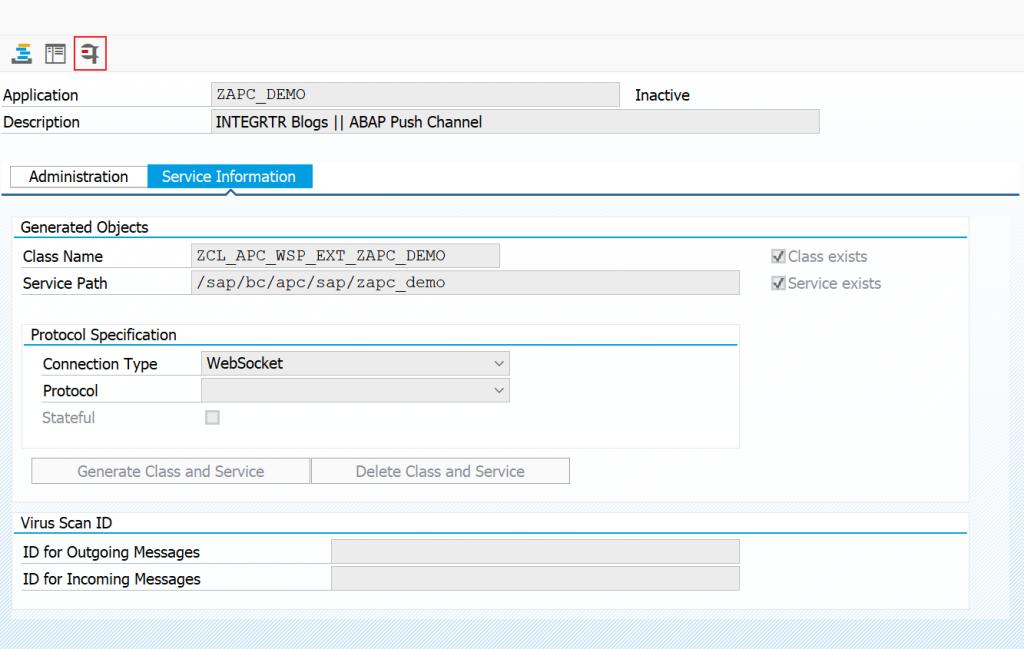
To create a WebSocket in ABAP, we actually need to create an ABAP Push Channel Application which corresponds to WebSocket as mentioned earlier. Follow the steps provided below.
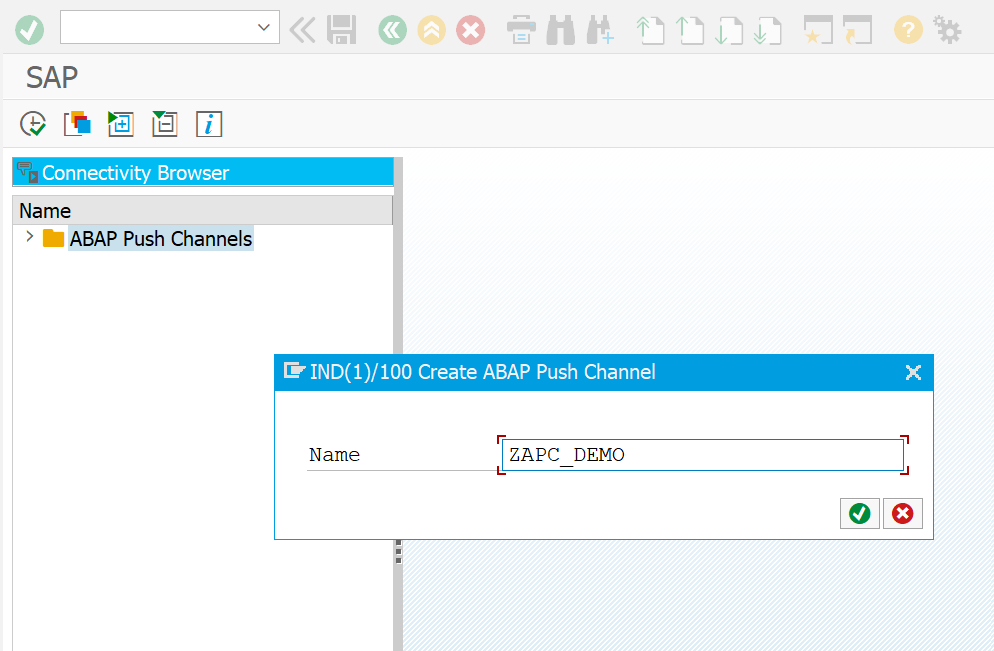
- Go to Transaction SAPC.
- Right click on ABAP Push Channels → Create. Provide the name of the push channel application or basically WebSocket.
- Provide name, then Click on Generate Class and Service to generate Class and ICF Service.
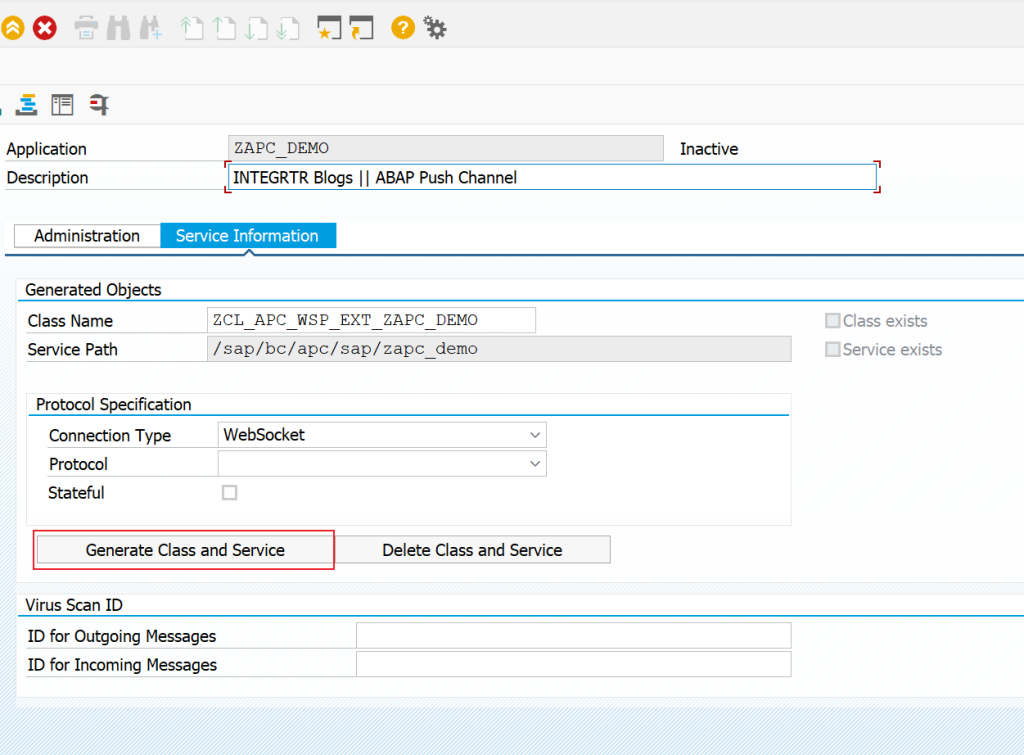
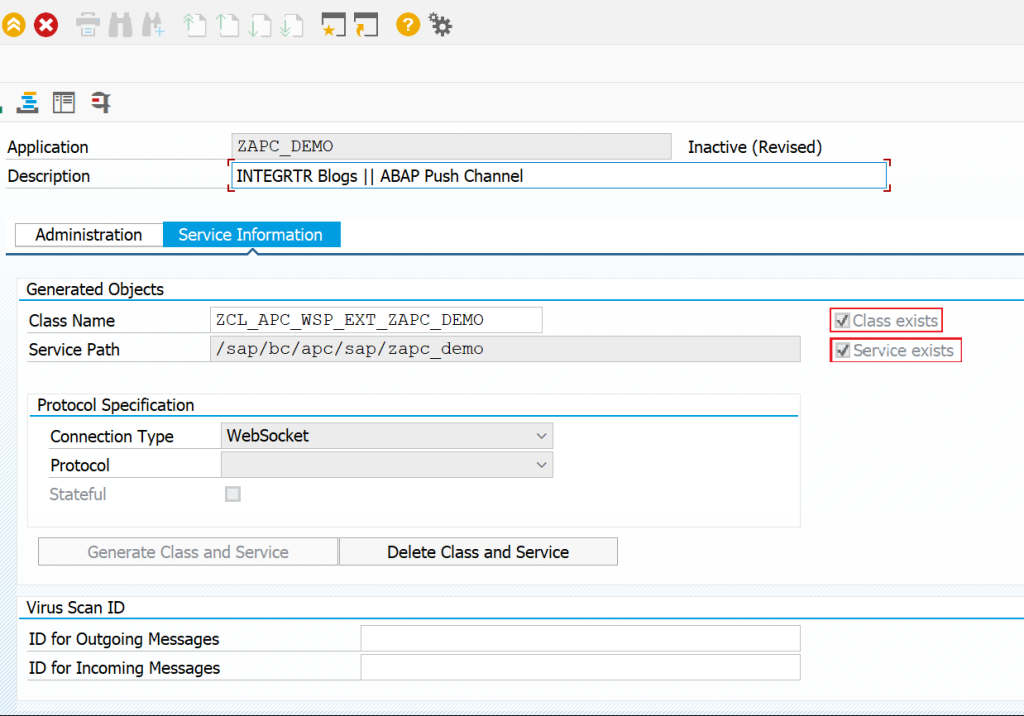
- Save and Activate.

- Double click on the Class Name to Navigate to the Class Definition.
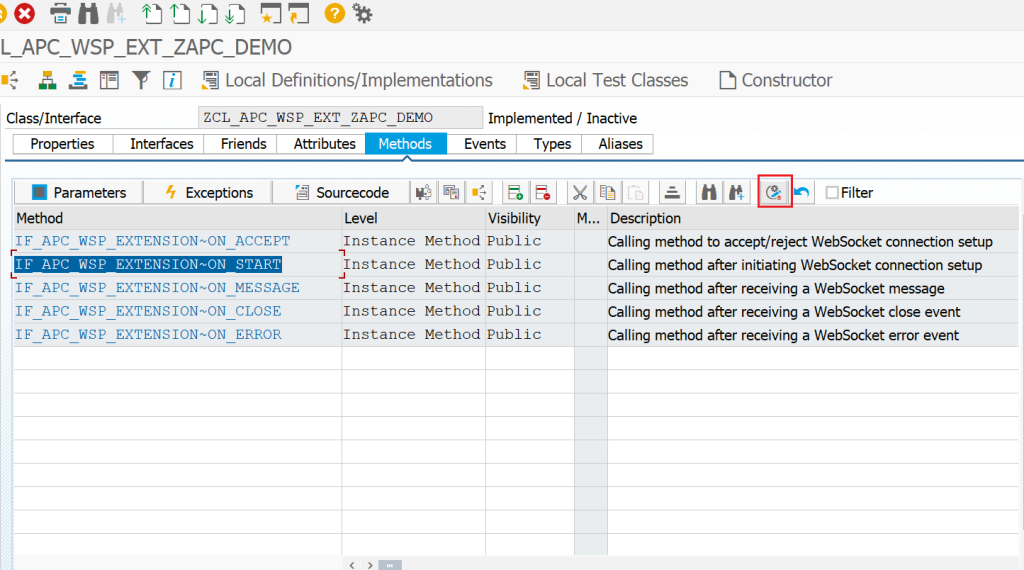
💡 We need to implement the Class method ON_START and ON_MESSAGE to resolve the issues. It is mandatory to implement at least these two methods.
- Redefine the methods ON_START and ON_MESSAGE using the code provided below.
Usage of Different methods
ON_ACCEPT : This method is executed whenever a WebSocket connection is requested and it is used to either ACCEPT or REJECT the connection request.
ON_START : Executed as soon as the WebSocket connection setup is completely successful after ON_ACCEPT method accepts the request.
ON_MESSAGE : Executed when receiving a message.
ON_CLOSE : This method is called before closing a connection and performing any resource clean up activity.
ON_ERROR : This method is called when a connection is interrupted due to error, after successful execution of ON_ERROR the ON_CLOSE method is executed.
ON_START
DATA: lo_message      TYPE REF TO if_apc_wsp_message,
      lx_cx_apc_error TYPE REF TO cx_apc_error.
    TRY.
        lo_message = i_message_manager->create_message( ).
        lo_message->set_text( |{ sy-mandt }/{ sy-uname }: ON_START has been successfully executed !| ).
        i_message_manager->send( lo_message ).

      CATCH cx_apc_error INTO DATA(lx_apc_error).
       MESSAGE lx_apc_error->get_text( ) TYPE 'E'.
    ENDTRY.
ON_MESSAGE
DATA: lv_text      TYPE string,
      lo_message   TYPE REF TO if_apc_wsp_message,
      lx_apc_error TYPE REF TO cx_apc_error.

    TRY.
* Get the received message
        lv_text = i_message->get_text( ).
* create the message object
        lo_message = i_message_manager->create_message( ).
* send message
        lo_message->set_text( |{ sy-mandt }/{ sy-uname }: ON_MESSAGE has been successfully executed !| ).
        i_message_manager->send( lo_message ).
* send the received message
        lo_message->set_text( lv_text ).
        i_message_manager->send( lo_message ).
      CATCH cx_apc_error INTO lx_apc_error.
        MESSAGE lx_apc_error->get_text( ) TYPE 'E'.
ENDTRY.- Now Save and Activate the class and APC application.
💡 Hurray 🎉 , You just created your first WebSocket in ABAP.
Now we have created the WebSocket, the next question that comes to mind is how are we going to test it.
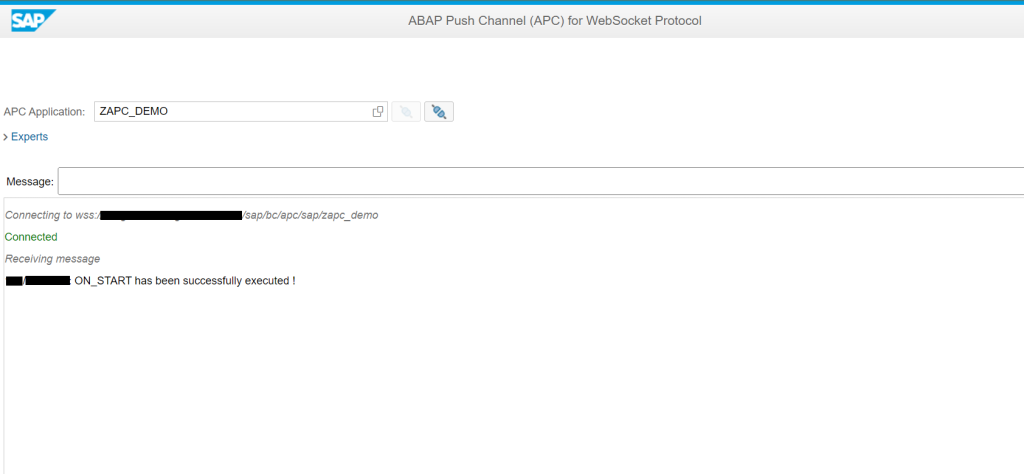
We will use a Web Dynpro Application provided by SAP for the testing of WebSocket or ABAP Push Channel application.
Go to the APC Application we just created and Click on the Test icon.
UI will open up in the browser.
💡 ON_START method will be executed as soon as the WebSocket connection is setup successfully.
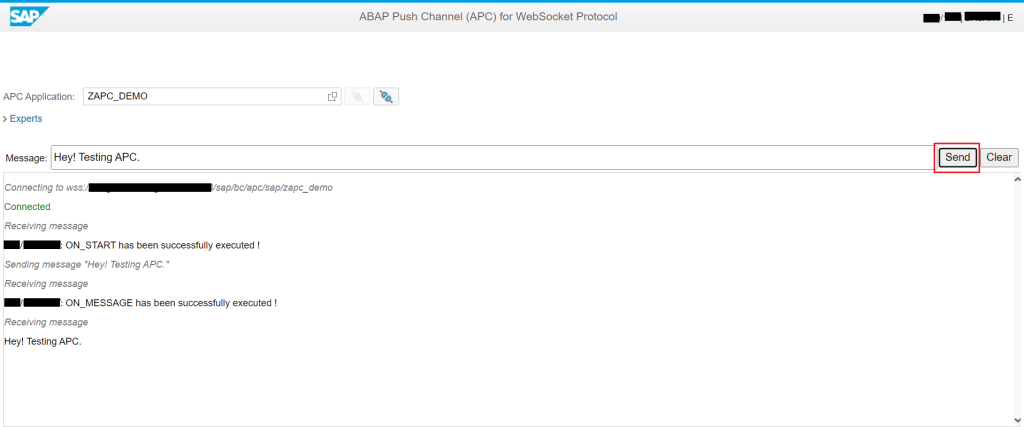
Add a message and click on the Send button.
💡 ON_MESSAGE method gets executed whenever a message is sent.
Now we have learned how to create a WebSocket in ABAP, let us see how we can consume it in UI.
Dive into UI Elements
SAP provides a standard library for WebSockets. They are similar to the native WebSockets. We can make use of class sap.ui.core.ws.WebSocket↗️.
Code snippet below shows how we can create a new WebSocket connection:
new sap.ui.core.ws.WebSocket(sUrl, aProtocols?)

//Example
const ui5socket = new sap.ui.core.ws.WebSocket('wss://:port/sap/bc/apc/sap/<myapplication>);sUrl: relative or absolute URL for WebSocket connection.
aProtocols: array of protocols as strings, a single protocol as a string
Let us learn about the various events and methods:
- The
closeevent is fired when the connection was closed. - The
errorevent is fired when an error occurred. - The
messageevent is fired when a message was received. - The
openevent is fired when the connection was successfully opened.
// sends a message
// If the connection is not yet opened, the message
// will be queued and sent when the connection is established.
 ui5socket.send('The message');

// connection opened
ui5socket.attachOpen(() => {
// triggred when the connection is successfully opened
});

// server messages
ui5socket.attachMessage() => {
// triggred when a message is received
});

// error handling
ui5socket.attachError(() => {
// triggred when an error has occurred
});

// connection close
ui5socket.attachClose(() => {
// triggred when the connection is closed
});
If you want to create a detailed UI5 application using WebSockets, you can refer to this very well written blog ↗️
So, now that you have the basic understanding of how to create a WebSocket in ABAP and how to consume it in a UI5 application. Then, what is stopping you… go ahead.. be Dora the explorer!