


Hello Technophiles!!
Welcome to the second part of our blog series on ABAP RAP (ABAP RESTful Application Programming model). In the first part (visit here), we discussed about different programming models of ABAP, learned about RAP and its layers. In this part, we will look at a development scenario that will help you understand and use RAP much more effectively. But hold on, have you set up your development environment?
For those of you who haven’t, here is the link. Just follow the instructions and get it ready.
Note: The below section assumes that your basic setup is in place!!
Great, now that you know what ABAP RAP is and have a basic setup running, let’s dive into it with a practical application and understand the technicalities involved.

Disclaimer: We are going to look at an end-to-end scenario and understand the design, architecture, and development flow. Well, obviously we don’t want to wander off without having any understanding of what we want to do. So we will be taking a small hire to retire scenario, discuss an outline for the solution and then begin our implementation accordingly.
Scenario
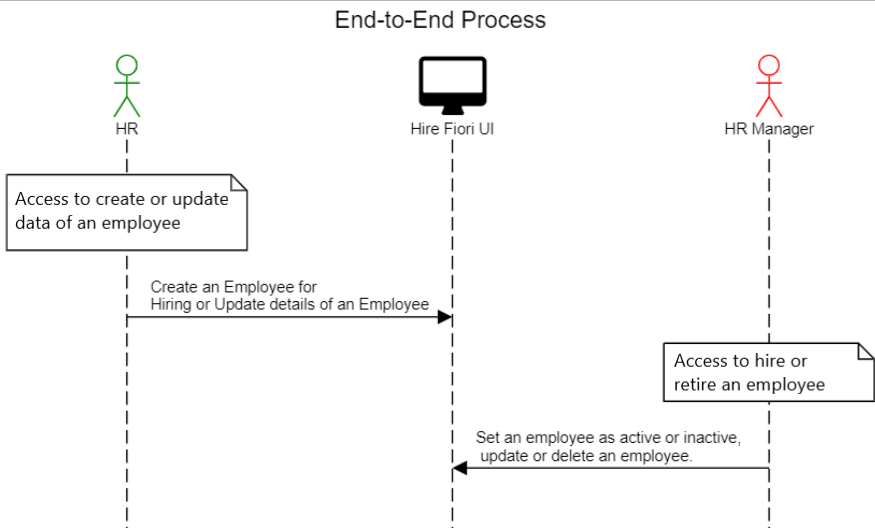
We have a hiring scenario where HR has permissions to create employee data if it does not exist, or update the details for an existing employee. HR Manager has permissions to set the status of hired or updated employees as active or inactive. The latter will also be able to delete and update certain information of employees from records provided by HR.
Other than create, update and delete operation (implemented automatically as we are implementing managed scenario), we will implement the following:
- Determination – Based on the position of an employee, his/her salary will be added or updated
- Validation – Check age of an employee based on their date of birth; it should be greater than or equal to 18 years.
- Action – HR Manager can set employee status as active or inactive which corresponds to hire and retire respectively.
For a better understanding of how our application will be looking, here is the Fiori UI app preview:
HR
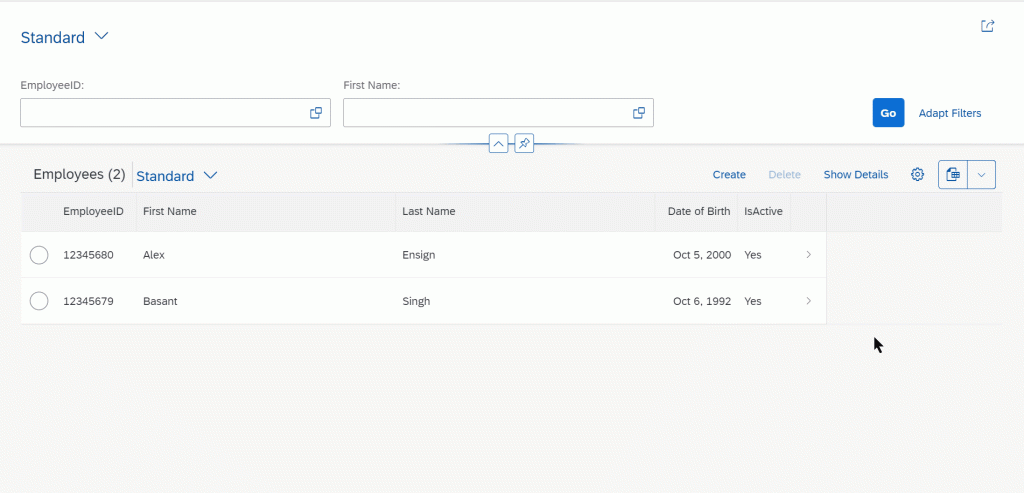
HR Manager
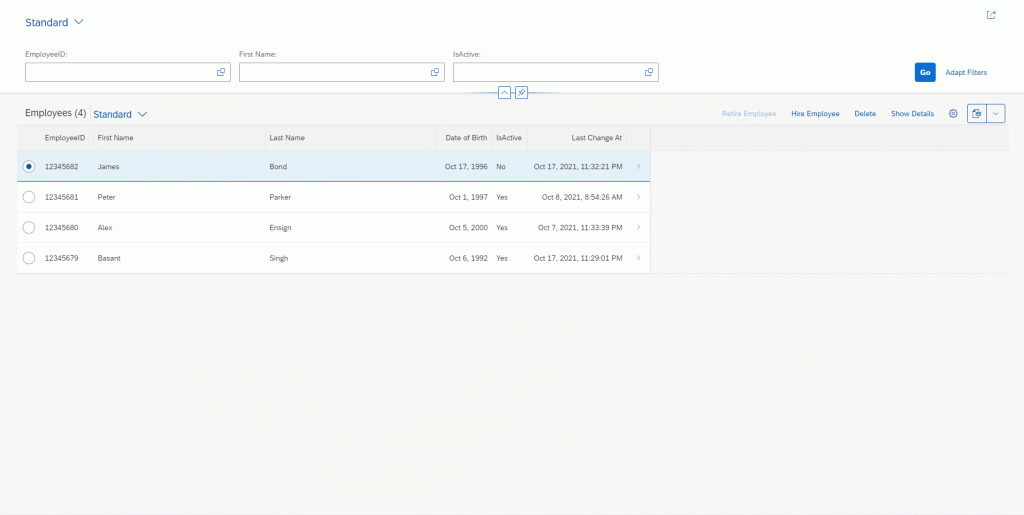
Isn’t it amazing to know that you have to do minimal coding and you can develop such cool applications!!

Approach to be followed
Let us divide this scenario into smaller parts and implement each part one after another. Analyzing it, we can identify the following steps:
- Creation of a package for storing project resources.
- Creation of three tables along with a data element which will be used across these tables.
- Employee information table: to store basic information about an employee.
- Employment information table: to store employment components like date of joining and salary.
- Position information table: to store position related information (this will be used as Value help/Check Table).
- Creation of a CDS interface view for creating a basic view without any extensive information which can be used by various services.
- Creation of a CDS Projection view exposing a subset element of CDS interface view. It is service agnostic.
- Creation of metadata extension for UI elements and Creation of Behavior definition and projection for defining the action possible on the service. Example- Create, Update, Delete, determination etc.
- Creation of Behavior implementation for writing the business logic related to action such as validation, action and determination.
- Creation of Binding service for defining the protocol used by the service. Example- OData V2 – UI, OData V2 – WebAPI etc.
- Expose the service.
Now that we have looked at the steps involved, let us begin with their development. We are going to assume that you have a basic understanding of ABAP RAP and its layers. If you do not feel confident about your understanding, we recommend you go through our previous blog.
Database Design
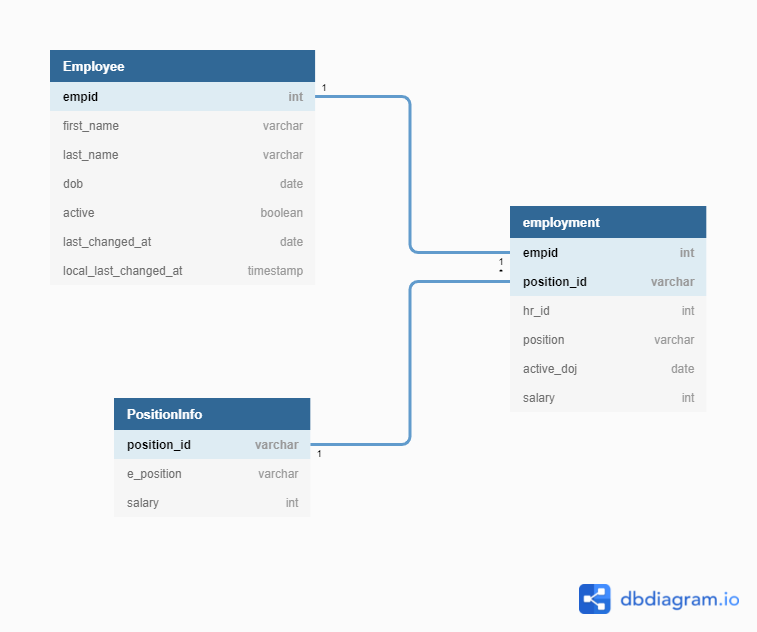
Here, the PositionInfo table is an independent table and will act as a check/value help table, whereas Employment table forms up a composition for the Employee table.
It’s time to start the creation of our end-to-end scenario. For this, the first step is to create a package.
- Create a package. A package is required so that all developments/project resources can be stored under one name. It acts like a folder that keeps together all the required developments of one particular project.
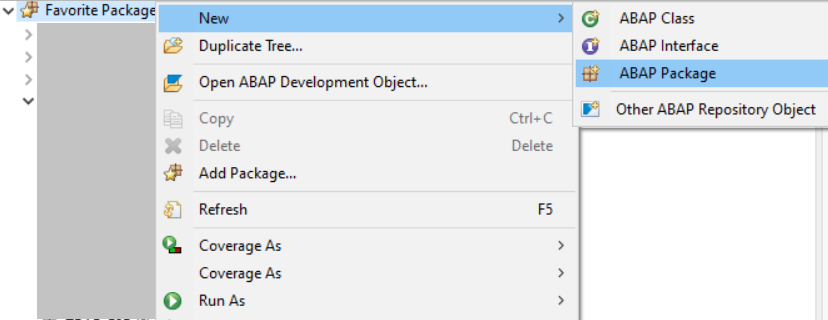
- Open project explorer and right click on ‘Favorite Packages’. Select New→ ABAP Package.
- Provide Name and Description for it and mark ‘Add to favorite packages’. This will keep your package on top where you can access it easily.
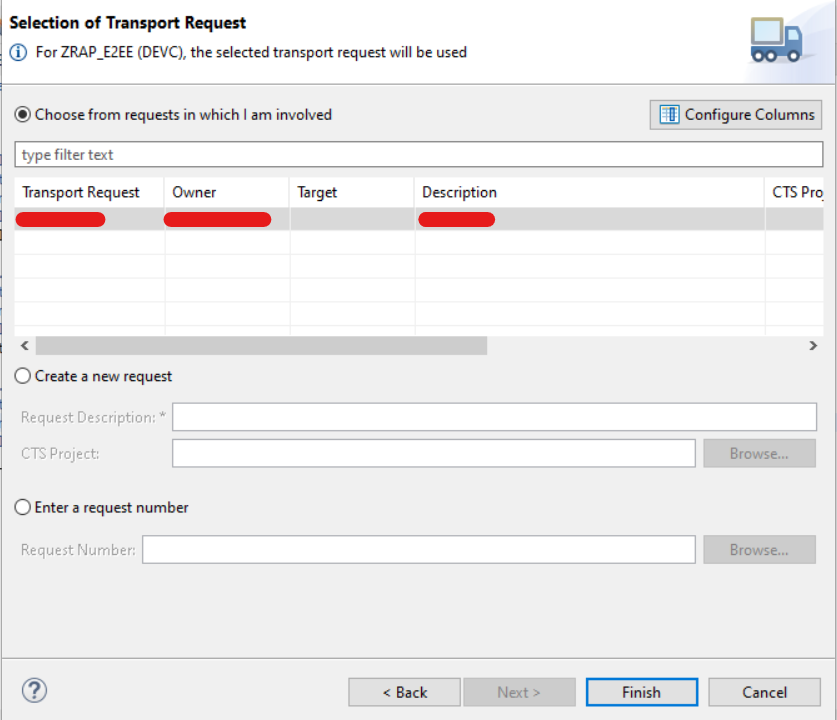
- Click Next and give ‘Software Component’. Go to the next step and create or select a transport request for the package and click on Finish. Your package will be created.
- We will now create database tables and a data element.
Creating Data Element
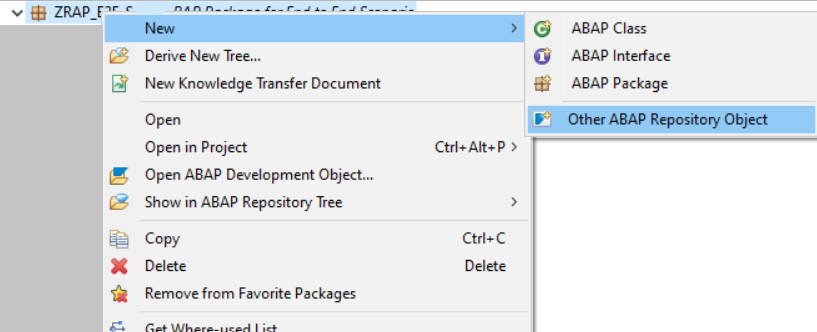
- To create a data element, right click on the package created and click on New→ Other ABAP Repository Object→ Data Element.

- Provide name to it, ZRAP_E2E_ID and give suitable description.
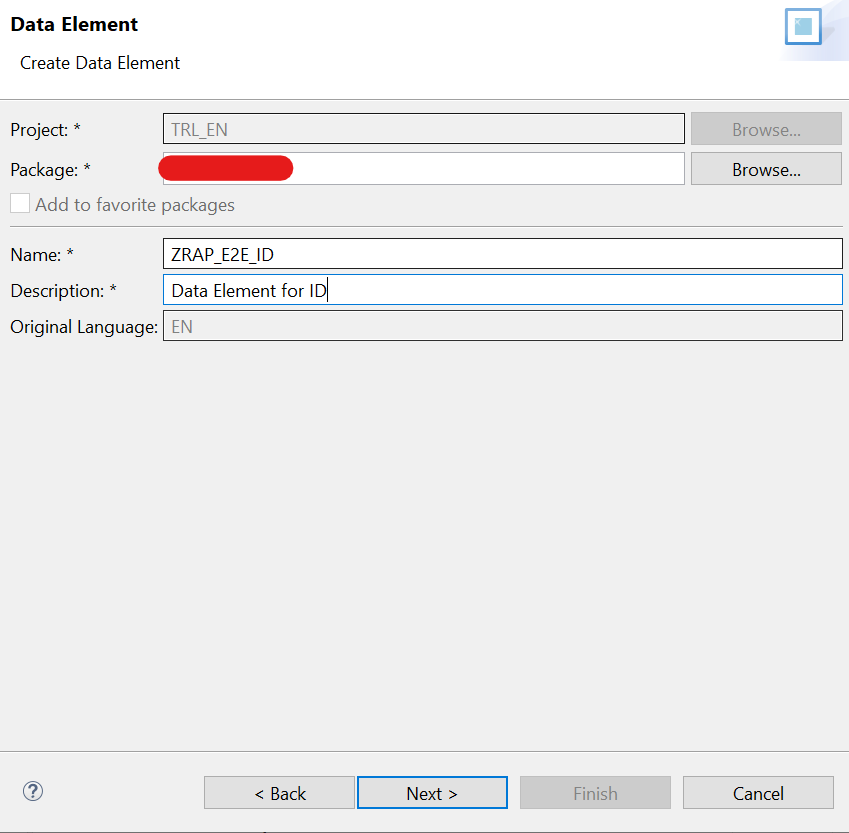
- Click on Next and provide Transport Request to it and then click on Finish. You will get a screen for providing data type information as shown below.

- Save and Activate.
Note: We have to create three tables according to our scenario. In the below section, you’ll see steps for the creation of one of the tables and can follow the same for other two. In case of any confusion, you can go to our GitHub repository where steps for the creation of all tables are given individually.
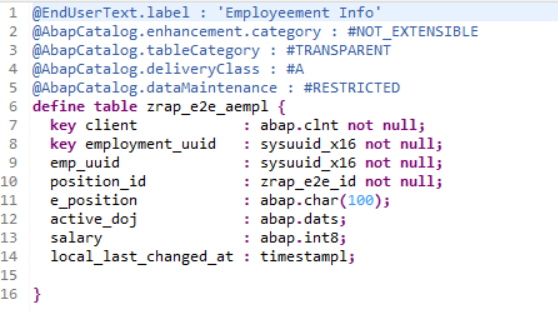
Employee Information Table
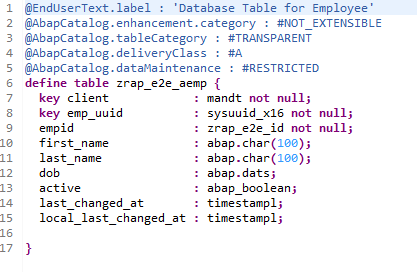
This table will store details about an employee like employee ID, first and last name, date of birth, etc.
- To create this table, right click on the package created and click on New→ Other ABAP Repository Object→ Database Table.
- Provide a name to it, ZRAP_E2E_AEMP and give suitable description.
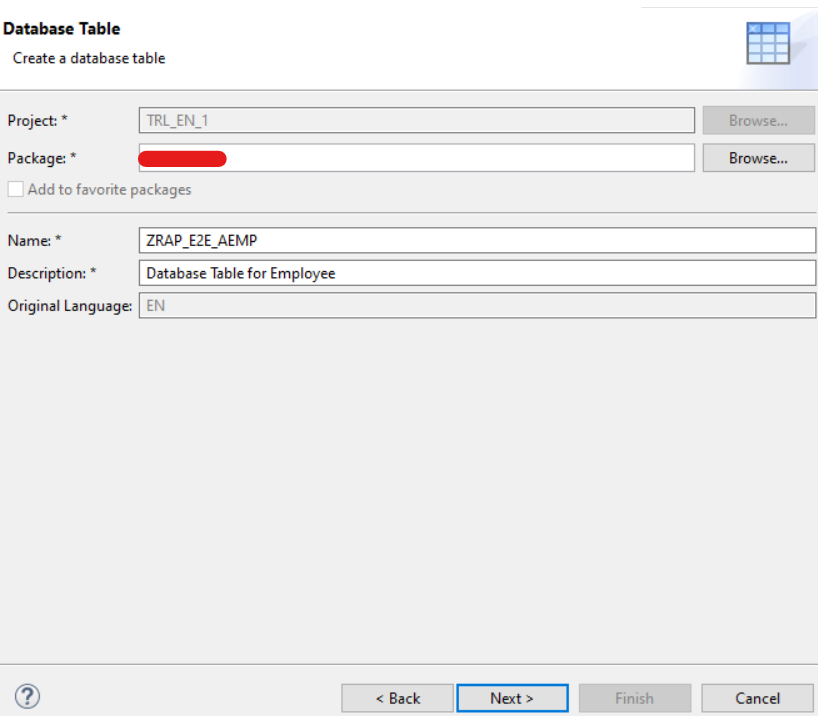
- Click on Next and provide Transport Request to it and then click on Finish. You will get a predefined outline of code where you can enter the below code.
- Save and Activate.
Annotations such as @AbapCatalog.deliveryClass, @AbapCatalog.dataMaintenance are attributes of the table, similar to the one provided while creating table via GUI.
In RAP, a combination of ABAP CDS and SQL are used for the creation of a table.
Employment Information table:
Position Information table

We have completed the first two steps of our solution. Let’s take a break here so that we do not overburden ourselves with a lot of information at once. In this blog post, we saw the architecture, database design, creation of package, and creation of tables for our scenario.
In the upcoming parts of our blog, we are going to learn more about CDS Views (Interface and projection view), behavior definition, and implementation while using them to solve the scenario at present. It is recommended to get an understanding of all layers of RAP and the elements we talked about in this part. That’s it for now, we’ll continue on our journey of learning ABAP RAP soon. Till then, goodbye and happy learning!!