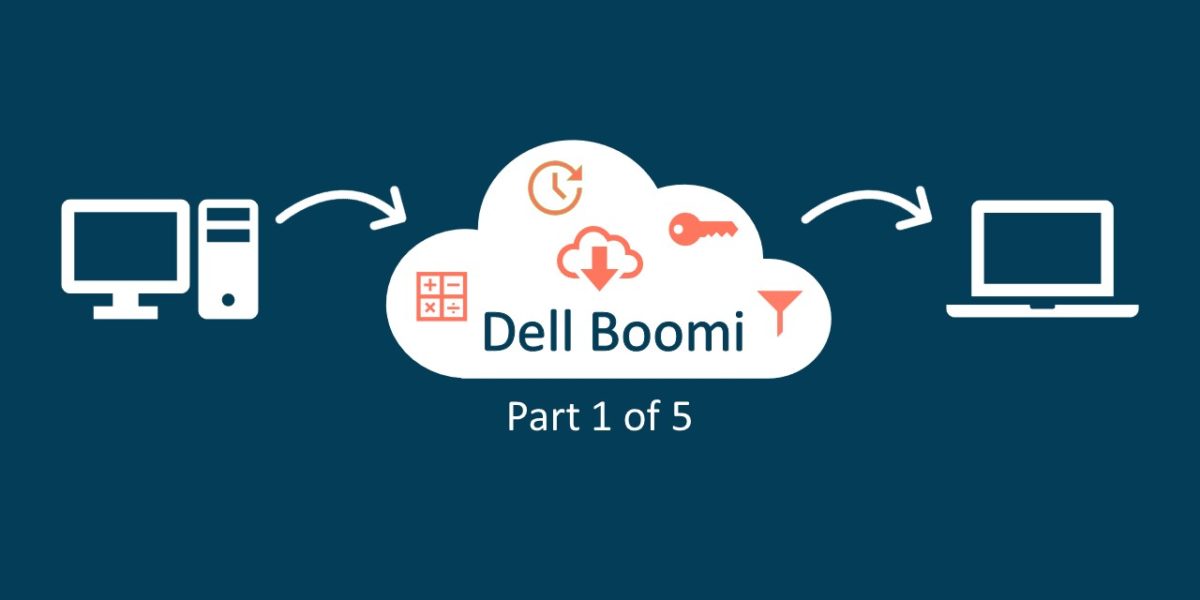


Hello Integration enthusiasts.
Welcome to the first part of Enterprise Integration with Dell Boomi; a blog series for those who want to learn ERP Integration using Dell Boomi in a fun and practical manner.
We have already been introduced to the world of Enterprise Integration through SAP CPI in our previous blog series. We’re going to take a similar approach but we’ll also try to analyze how different these 2 tools are when it comes to building integration/process flows that serve the same purpose.
Prerequisite
It is expected that you know the basics of Dell Boomi and Boomi AtomSphere. If not, you go through this short but comprehensive introduction.
If you haven’t read the blog series on SAP CPI, it is recommended that you do so since we are going to take the same scenario for this blog post series. Familiarity with the previous blog posts will help you in understanding the practical differences between Dell Boomi and CPI better, but it is by no means, necessary.
Scenario
We run a supermarket called ‘Northwind’. For inventory management, we maintain a list of products along with relevant details like product name, category, units left in stock, unit price and the supplier Id. We have also defined a threshold parameter called ‘Reorder Level’ for each product. Whenever the units in stock of a product becomes equal to or less than this threshold, it becomes eligible for reordering. Every day, we have to e-mail the list of items (in CSV format) that have to be reordered along with supplier details so that our store manager can place orders.
Our Data Source
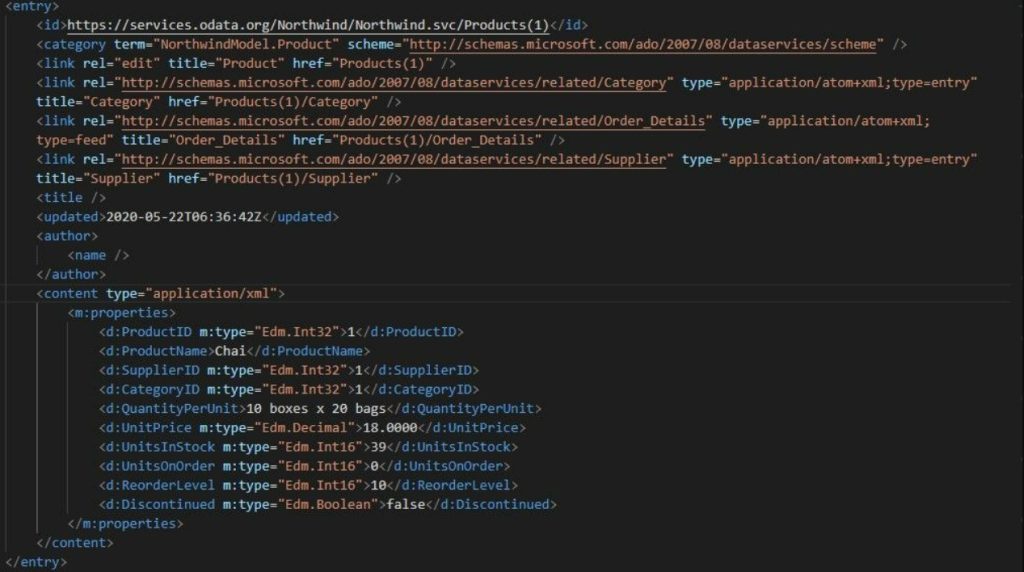
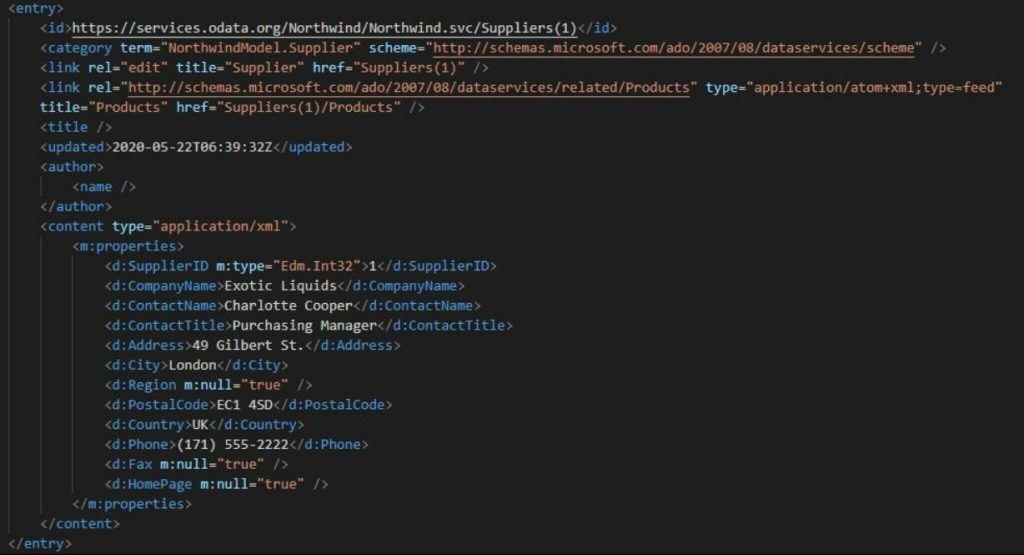
We’ll be using a public OData service (Northwind) for our use-case. Below are some samples of how the data feeds for our inventory management system looks like:
Approach
Like we did last time, we are going to divide the problem into smaller parts and solve each part one after the other. We had identified the following steps to the solution last time:
- Configure the Integration to run every day
- Obtain the list of products
- For each product in the list, identify if reordering is required
- If product must be reordered, obtain supplier info
- Create a list of the products to be reordered along with supplier info
- Convert List into csv format
- Send List to Manager via Email
The steps to be followed in Dell Boomi will be a little different. In SAP CPI, we had configured the integration to run everyday using the start timer shape and hence it made sense to introduce you to this shape and the underlying concept in the first step. However, in Boomi, process scheduling is done after the process is deployed. And so, it’s better to take this up later. We’ll keep the rest of the steps as they were so that we can assess the differences between SAP CPI and Dell Boomi. Please note that the process flow we’re going to create may not be the most optimal one. The goal is to learn about as many components as we can while building this process flow and we do not mind taking a few extra steps if that leads to better comparisons.
Thus, the new list of steps will look something like:
- Obtain the list of products
- For each product in the list, identify if reordering is required
- If product must be reordered, obtain supplier info
- Create a list of the products to be reordered along with supplier info
- Convert List into csv format
- Send List to Manager via Email
- Configure the Process to run every day
Now that we know the basic steps to be taken, we’re going to begin with development of the process flow.
Sign into your Boomi account here. If you don’t already have an account, you can sign up for a free trial.

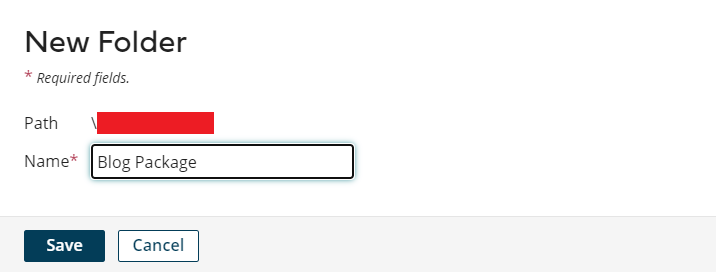
Once we have signed in, we are going to create a new folder to house this project. This is done in the Component Explorer (left most pane) by clicking on the dropdown arrow next to the topmost folder (which has the same name as your account name) and selecting ‘New Folder’.
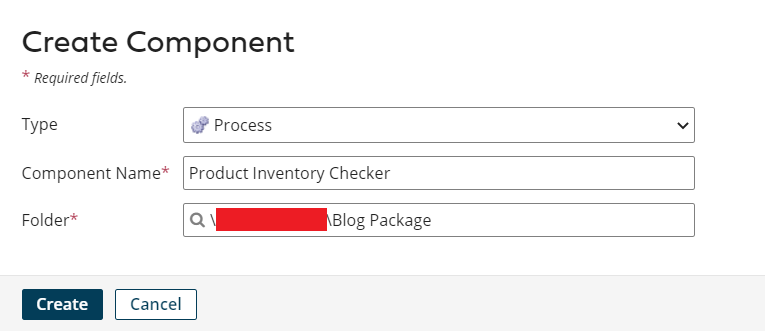
Now, we’re going to create our process component. Before that, let’s understand what these terms mean.
Components in Boomi
Components are the reusable configuration objects that are used in processes. They are displayed in the Component Explorer. Components can be created once and referenced by process shapes across multiple processes.
Process
A process is comprised of a series of steps, represented by shapes, that dictate how the process retrieves, manipulates, routes, and sends data from source to destination.
Once the process has been created, it will be visible on the canvas and a start shape will be present by default.
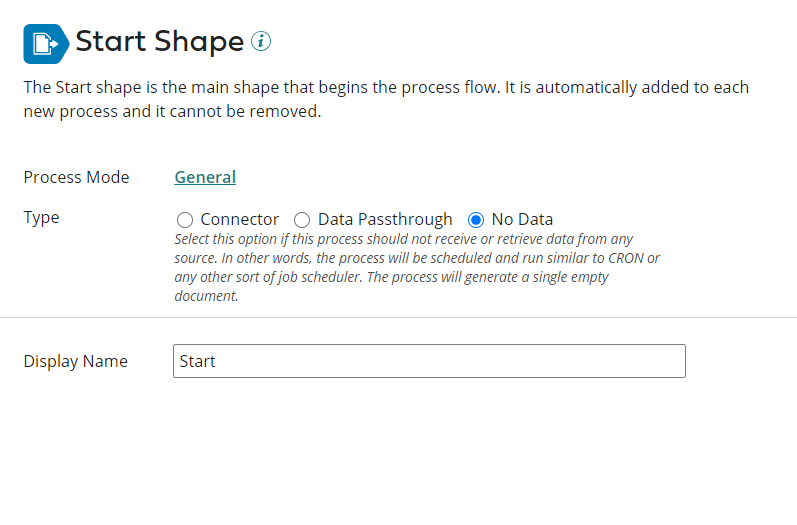
Click on the start shape to configure it. It can be set to one of the following 3 types:
- Connector: Gets data into the process or sends data out of the process using one of the application or technology connectors.
- Data Passthrough: Gets data into the process from another parent process or another external source.
- No Data: The process does not receive or retrieve data from any source. Instead, a single empty document is forwarded through the process flow.
We will be using ‘No Data’ because our process is to be scheduled and does not expect any data to begin.

In SAP CPI, we used different combinations of start shape and connectors to achieve what this start shape can do in Dell Boomi. These connectors were not a part of the shape itself in SAP CPI. Instead they were represented as the connection between a sender shape and Start Message Shape. In Boomi, sender shapes and these external connector shapes are missing. It is worth noting that even though the start shape has the option to specify connectors, connector components are still quite independent and re-usable in Dell Boomi. We’ll talk about this later in more detail.
Step 1: Obtain list of products
The first step of this integration is to obtain the list of products in our inventory. Our list of products can be fetched using OData protocol. If you do not know much about OData protocol, don’t worry, this page has all you need to know for now.
To fetch this data, we use an OData Client connector. This connector can be used to Get, Delete, Create, Update and Query data from an OData source.
We are going to further divide this step into smaller steps and take them one by one.
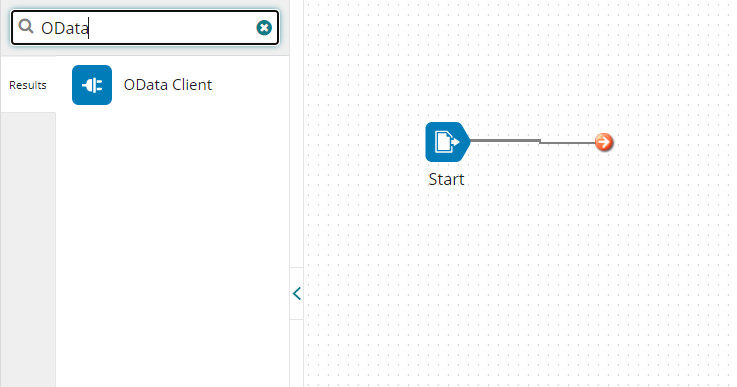
Step 1.1: Add Shape on Canvas
You can find this connector by searching in the Search Shapes bar. Drag and place it next to the start shape on the canvas.
Step 1.2: Configure Connector Shape
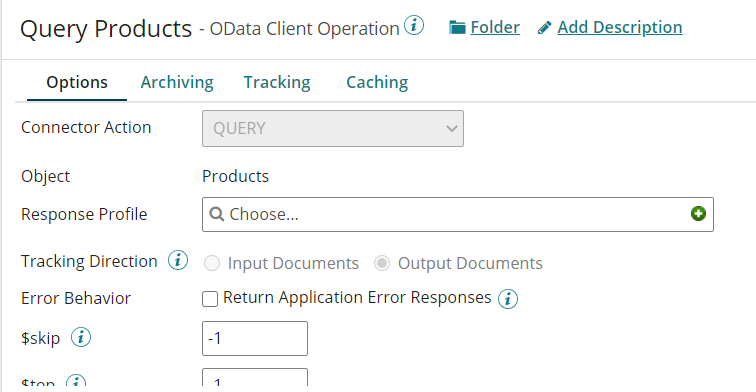
You will be greeted by it’s configuration options like this:
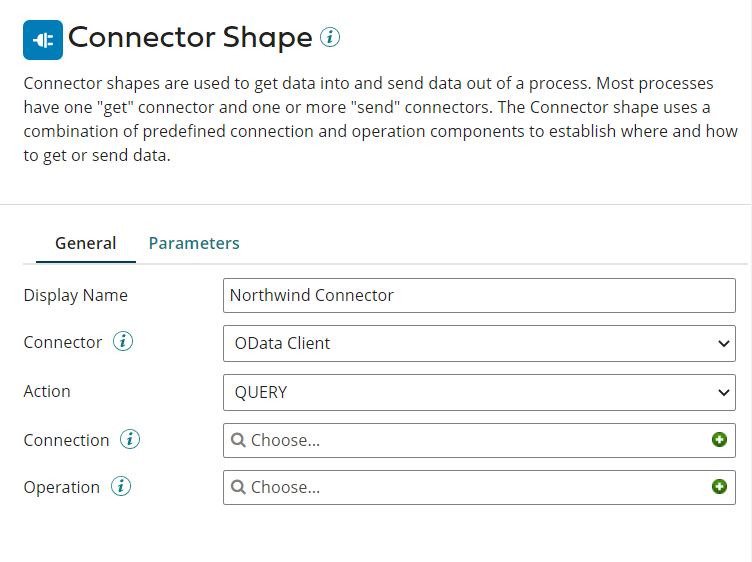
Insert a Display Name for this Shape. Since we want to obtain data from our OData Source based on certain condition, we select the Action as Query.
Connector shapes have two components associated with them- Connection and Operation:
- Connection — The physical connection information; you define the URL of a data source or application, and provide credentials to access it.
- Operation — The function to call or files to act upon; how to process the data.
Both of these components are reusable and can be accessed throughout the process. Once they have been created, you can find them within our project folder under Connectors.
Step 1.3: Add/Select Connection
Click on the green plus button in the dropdown box next to Connection.
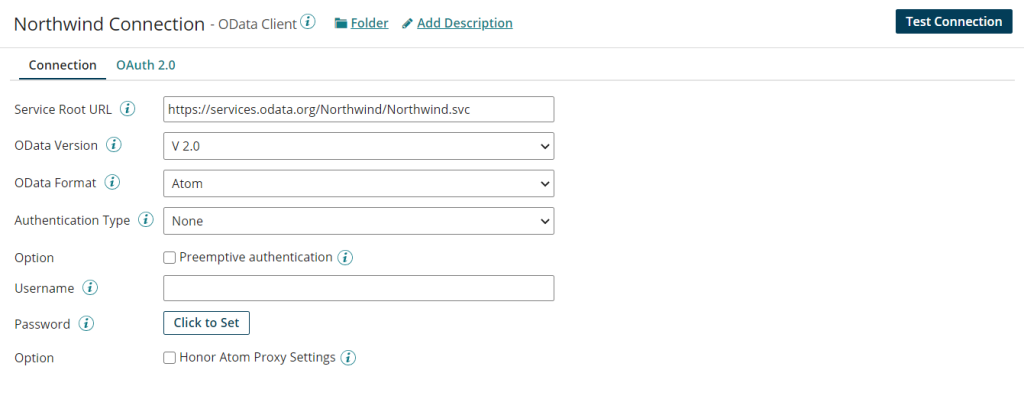
Insert the service root URL for our OData service. In this case, we have to insert : https://services.odata.org/Northwind/Northwind.svc
Next, we specify the OData version. We have the option to choose from V 1.0, V 2.0 and V 4.0. For the sake of parity with our previous blog series, we are going to select V 2.0.
Next we have to select OData format. We have the option to choose from Atom and JSON. Again, to keep things similar to what we had done in SAP CPI, we are going to select Atom.
Since our OData service does not require any authentication, we are going to set Authentication Type to None.
We do not need to configure anything else in this connection and we can now test this connection by clicking on the Test Connection Button on the right side of the previous screen.
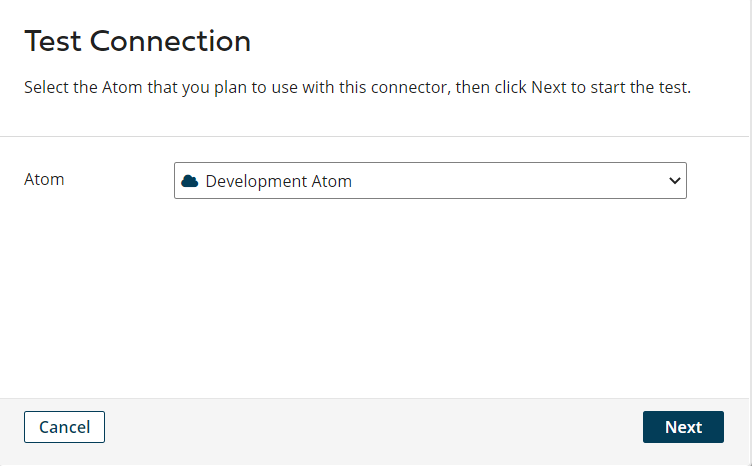
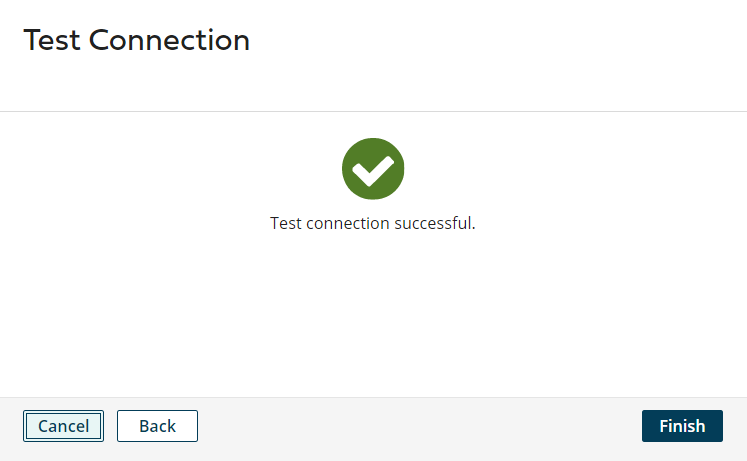
Select the Atom using which you want to test this connection and click on Next. If the connection details are correct, you will get the following screen. You can click on Finish and then on Save and Close on the connection configuration page. Once you have saved this connection, you can see it under Connectors folder within your project folder.
Step 1.4: Add/Select Operation
Click on the green plus icon in the operation drop down box and you’ll get a screen like this:

You will observe that the connector action is already set to QUERY since we had specified this in the connector shape itself.
Till now, we have specified the URL for our OData service and the connector action. But we haven’t yet defined which object details we want to obtain. Let’s do that now. Click on Import Button towards the right side of the screen.
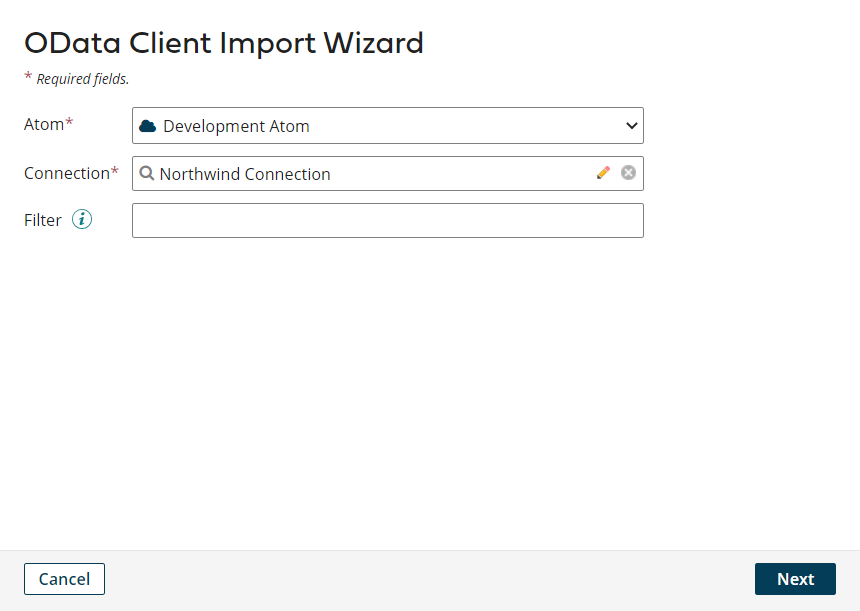
OData Client Import Wizard will pop up. Choose an Atom for executing this request, select the connection we had created in the previous step and click on Next. Note that we also have the option to put filters if we wish, but it’s not mandatory.
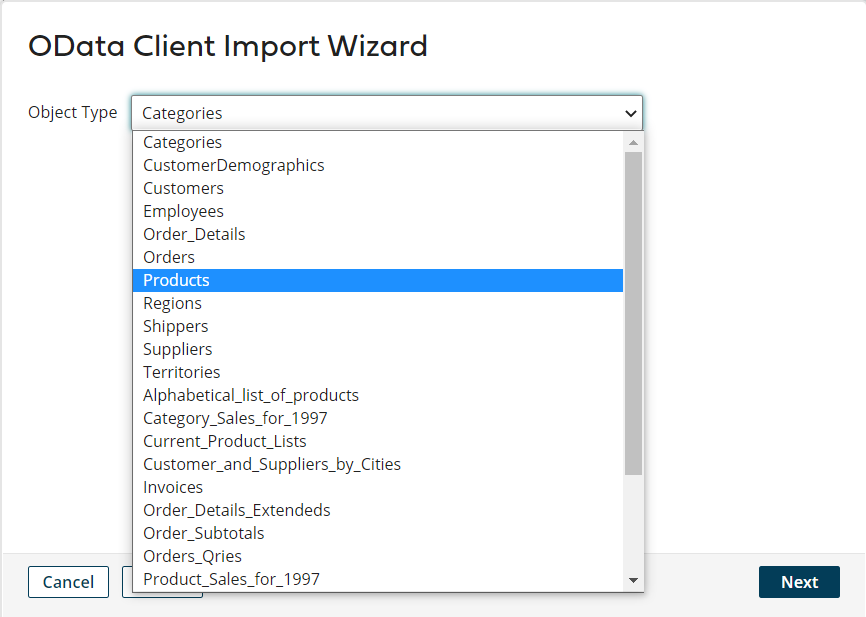
In the next screen, Select Products from the drop down box click on Next. Review your selections and click on Finish. We have now successfully selected the object for which we want to obtain details.
Now, we must select the Response Profile for this operation. Click on the input control associated to Response Profile to select and navigate to the project folder, You will find the response profile for our query operation there.
At this point, we have specified the OData service to be used, the object and the response profile expected. Now, we must specify which fields should be queried and query filters.
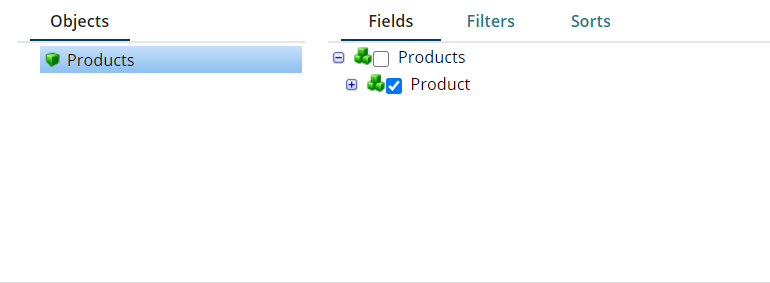
We will find these options towards the bottom of the screen. Click on Fields tab to select the fields that we want to be included in the response. We’re going to select the entire Product object as we want all fields in the response.
Now, we have to add filters on the filter tab. Why is this important? If we do not add any filters, every product will be fetched. This will include products which have been discontinued and those as well which have already been reordered. Thus, we want to add filters to ensure that only relevant products are fetched .

Click on the dropdown icon next to Filter and click on Add Logical Sub-Group. This is required since we want to put conditions based on 2 fields and create a logical association between them to form our final filter condition.
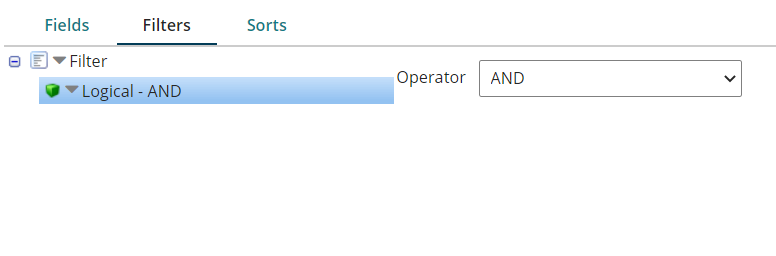
This is how the logical subgroup will look like. Since we want to filters on both fields to be true for a product to be fetched, we choose AND as the operator.
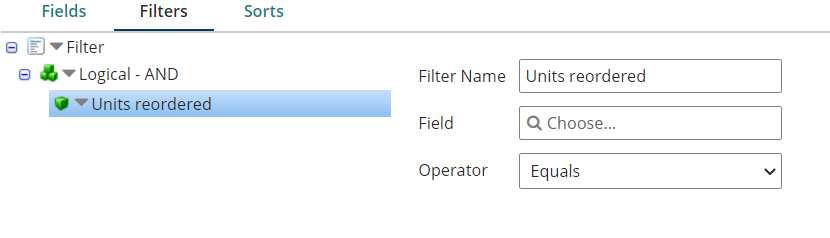
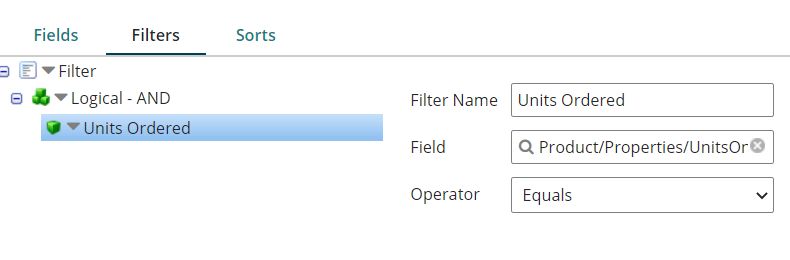
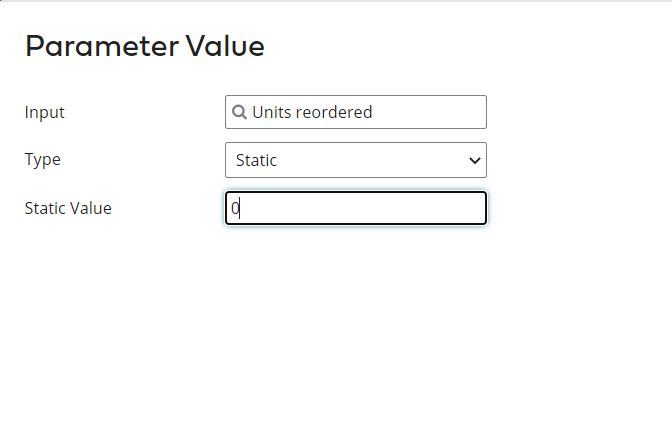
Now click on the dropdown icon next to this Logical – AND and then click on Add Expression. Click on the expression and give it a proper name for Identification. We are going to name it as ‘Units reordered’ .
Next, we are going to choose the field on which this filter is to be put.
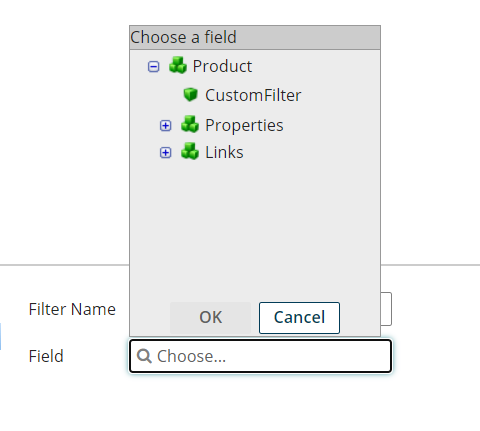
Choose ‘UnitsOnOrder’ under Properties. We are going to choose the operator as Equals. This completes the filter configuration. Later on, we will specify a parameter which will be tested against this condition.
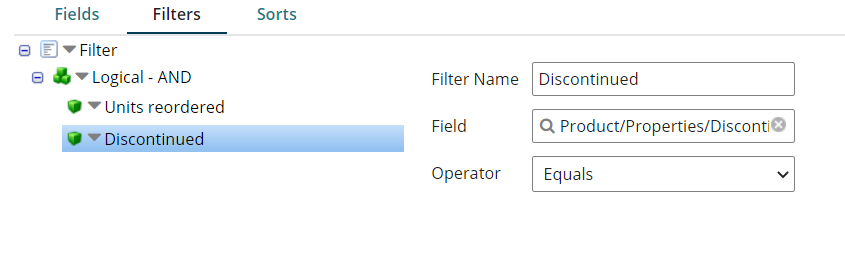
Repeat similar steps for the other filter.
Click on Save and Close.
Step 1.5: Configure Parameters
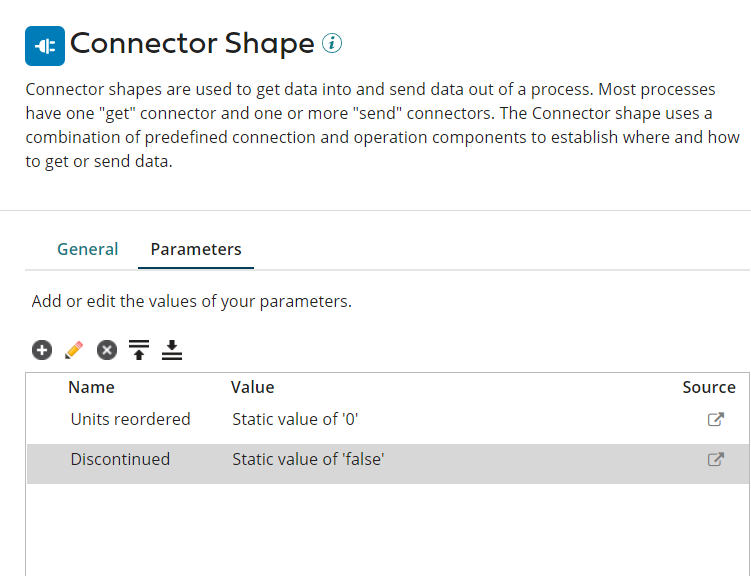
Now we come to the final step of query formation, addition of parameters. Go to the parameters tab of the connector shape.
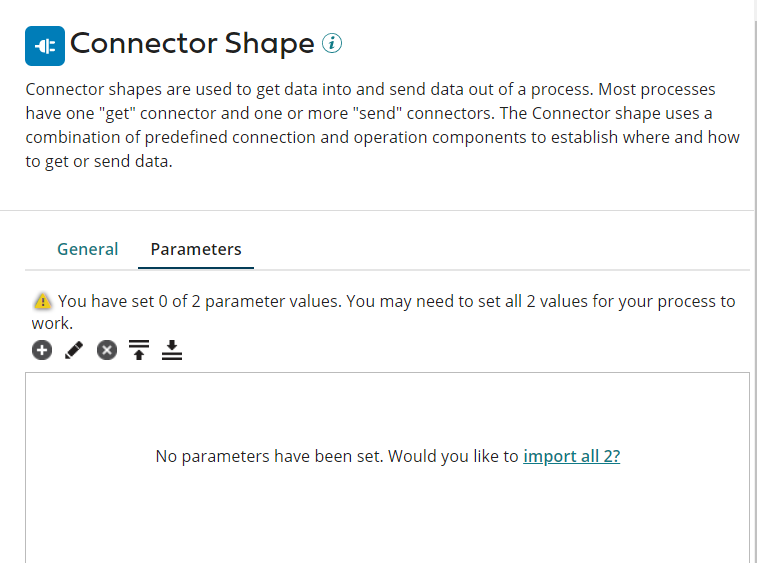
Here, you will see a prompt to import the parameters that we had specified in the previous step. This is an easy way to set parameters. Another way to go about it is to click on the Add Parameter (+) button . Using the dropdown marked as Input, choose the name of the parameter that you want to specify value for. We’ll keep the type as Static. For ‘Units reordered’, we’ll specify the Static Value as 0 and for Discontinued, we’ll specify it as false. Click on Ok and Save the process flow.
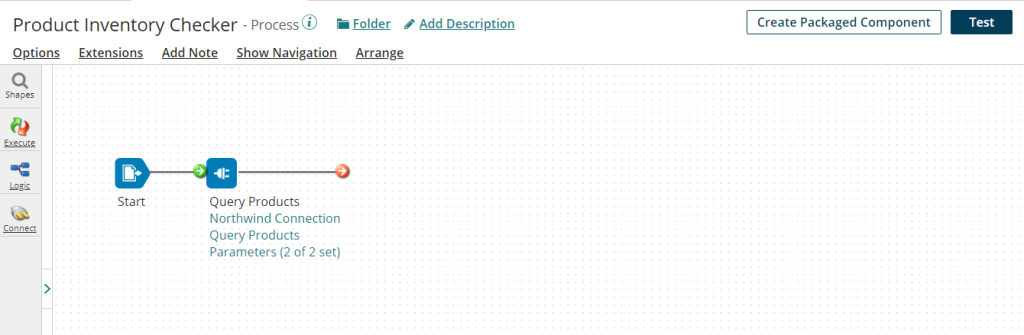
Now, our connector is fully configured and ready to be tested. Click on the arrow at the end of the start shape and drag it to the connector shape. The arrow till turn to green and the two shapes will be connected in the process flow.
One may argue that this is more complicated than what we had done in SAP CPI. But that doesn’t mean that it doesn’t come with its advantages. All the components we created in the previous steps are available for reuse and can be easily reconfigured without actually editing the process itself.
Test Mode
We’re going to discuss a very easy way to test our process flows without actually deploying it. AtomSphere offers the ability to unit test integration in a visual, real time view of the document flow. This is called Test Mode.
A similar option for testing was recently added to SAP CPI as well this has been a part of Boomi for quite long now.

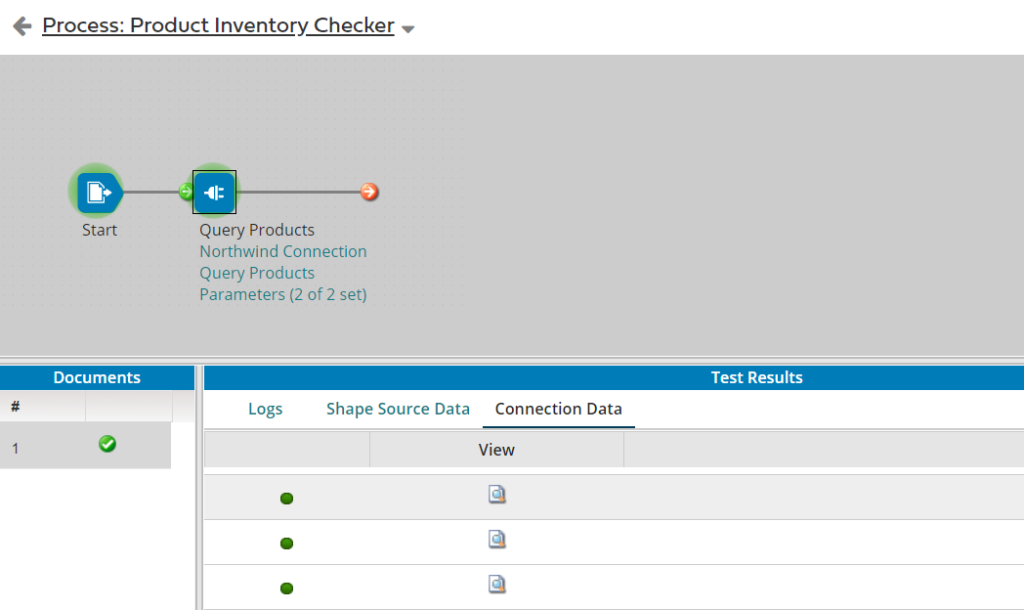
To use Test Mode, click on the Test Button towards the upper right corner of the canvas, select the Atom you want to use for testing and then click on Run Test.

Once the Test run is successful, you will see the following screen.
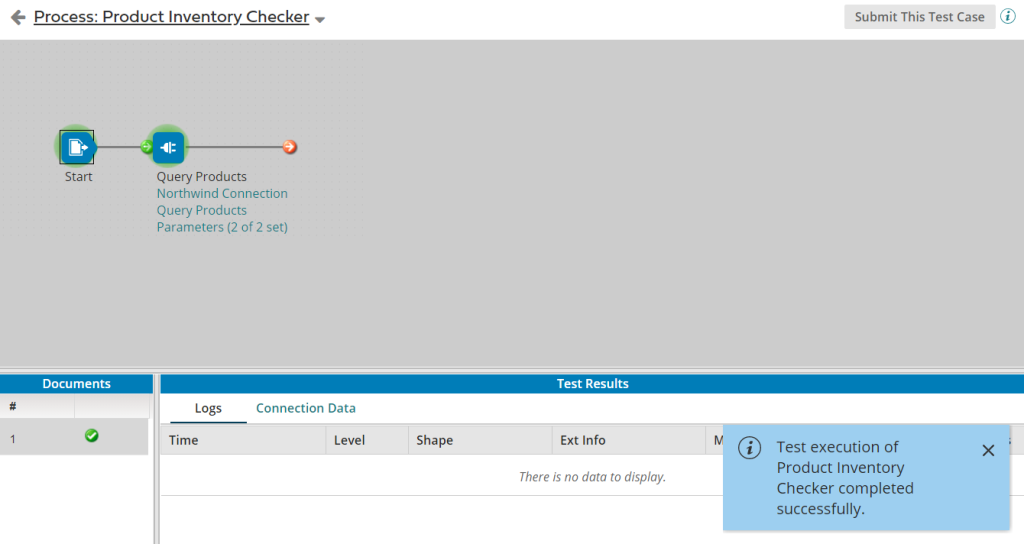
You can click on the shapes to see corresponding Logs and Data.
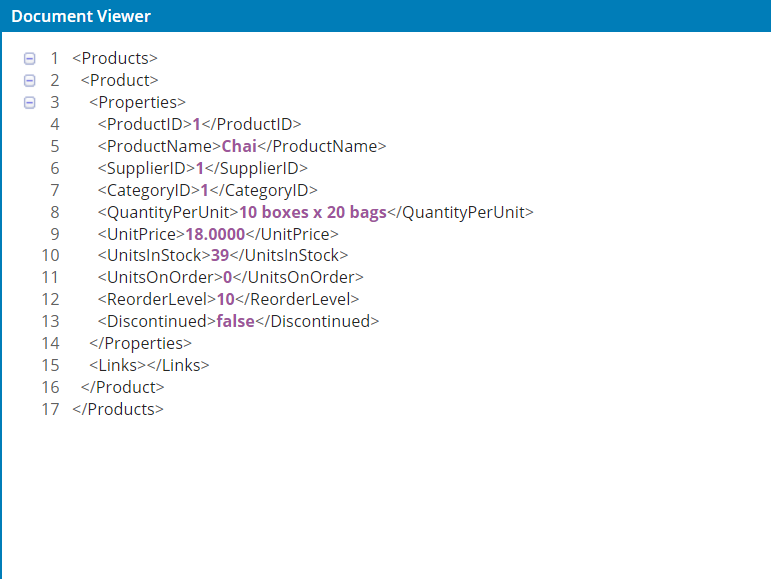
By clicking on a Data file, we can see it’s content as shown in the screenshot below:
Conclusion
In this Blog Post, we established the scenario, got familiar with the start shape and its options and created & configured a connector shape. We also learned how to use Test Mode in Dell Boomi. Most importantly, we looked at the practical differences between SAP CPI and Dell Boomi while we created our process.
We are going to take a pause at this stage so that we do not get overburdened with a lot of information at once. In the next blog posts, we are going to learn more about Dell Boomi shapes while using them to solve the problem at hand. It is recommended to get comfortable with the shapes as we come across them. That’s it for now, we’ll continue on our journey of learning Enterprise Integration soon. Till then, Goodbye and happy learning!