


Hello Technophiles!!
Welcome to fifth and the last part of our blog series on ABAP RAP. In the first four parts, we discussed about various programming models of ABAP, learned about ABAP RAP, divided the scenario into eight steps and implemented them till the fifth step. Now, in this blog, we will implement all remaining steps, i.e., from step 6 to 8. If you haven’t gone through our previous blog, we recommend you to first go through the same, understand the scenario and implement those steps mentioned here.
In this post, we are going to discuss steps 6 to 8, that will complete developments for our scenario:
- Creation of a package for storing project resources.
- Creation of three tables along with a data element which will be used across these tables..
- Employee information: to store basic information about an employee.
- Employment information: to store employment components like date of joining and salary.
- Position information: to store position related information (this will be used as Value help/Check Table).
- Creation of a CDS interface view for creating a basic view without any extensive information which can be used by various services.
- Creation of a CDS Projection view exposing a subset element of CDS interface view. It is service agnostic.
- Creation of metadata extension for UI elements and Creation of Behavior definition and projection for defining the action possible on the service. Example- Create, Update, Delete, determination etc.
- Creation of Behavior implementation for writing the business logic related to action such as validation, action and determination.
- Creation of binding definition along with service binding for defining the entities to expose and protocol used by the service respectively. Example- OData V2 – UI, OData V2 – WebAPI etc.
- Publish the service.
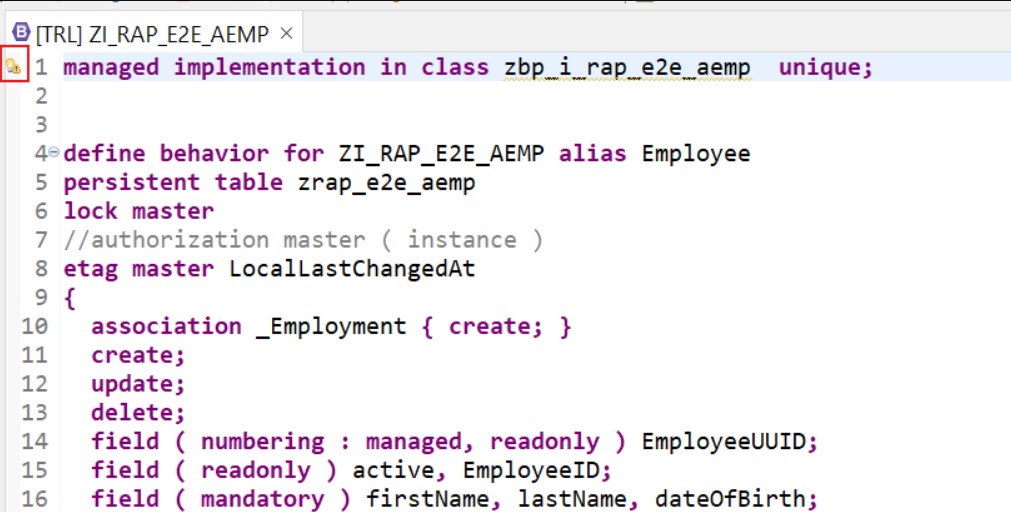
Step 6: Creation of Behavior implementation for writing the business logic related to action such as validation, action and determination.

After defining the behavior of service in the behavior definition, we need to implement business logic to make those behaviors work. This can be done by creating the class zbp_i_rap_e2e_aemp that was defined in behavior definition in the previous part.
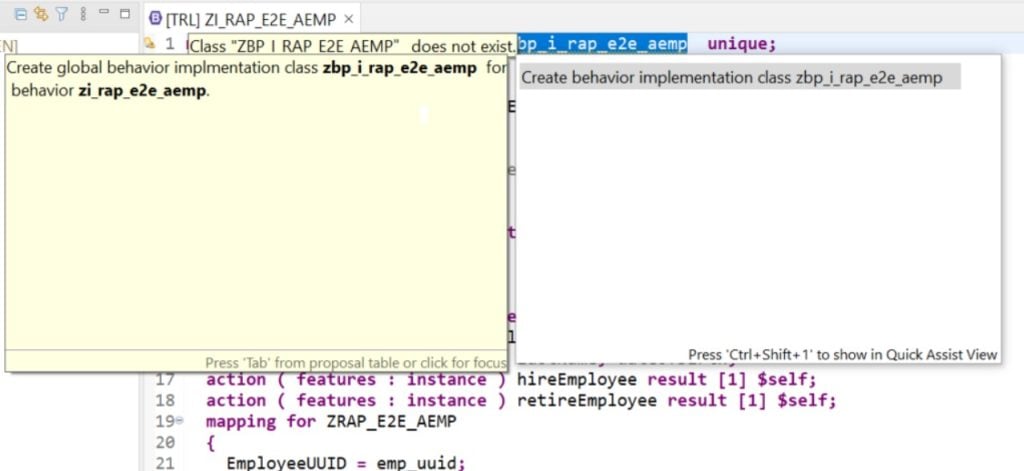
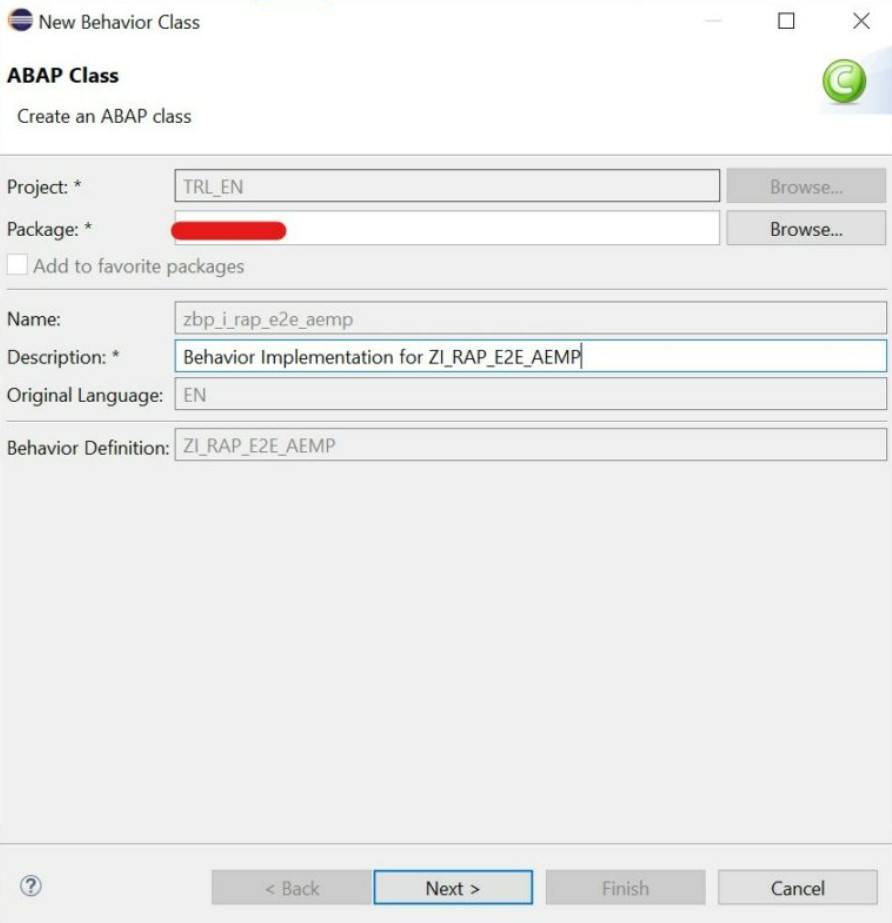
In order to create the mentioned class, click on the bulb like button on the left side of the statement in line.
After creating the class, you will get a class with boiler plate code containing class definition and implementation for different entities being exposed. This is the place where we will further write the business logic.
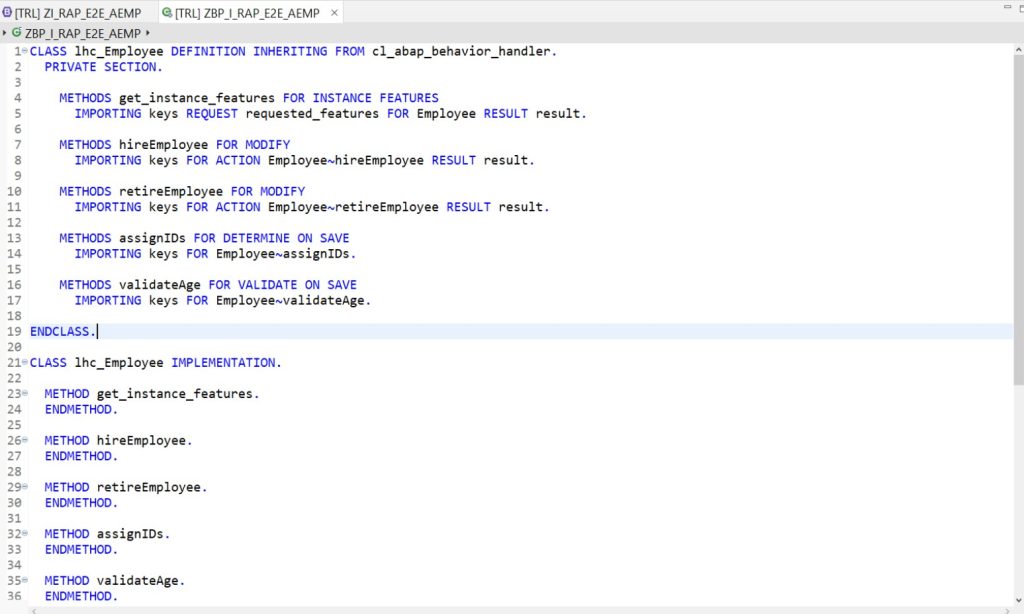
🤔 If you notice, we can see that there is a method named get_instance_features. It is generated and doesn’t seem to align with the name of any validation, determination and action. Isn’t is strange ?
Method get_instance_features is created for dynamic feature control for some standard operations, actions and on field level. It means depending on the feature conditions, the operation is either executable or not. We will implement this for Action in our scenario, namely Hire Employee and Retire Employee.
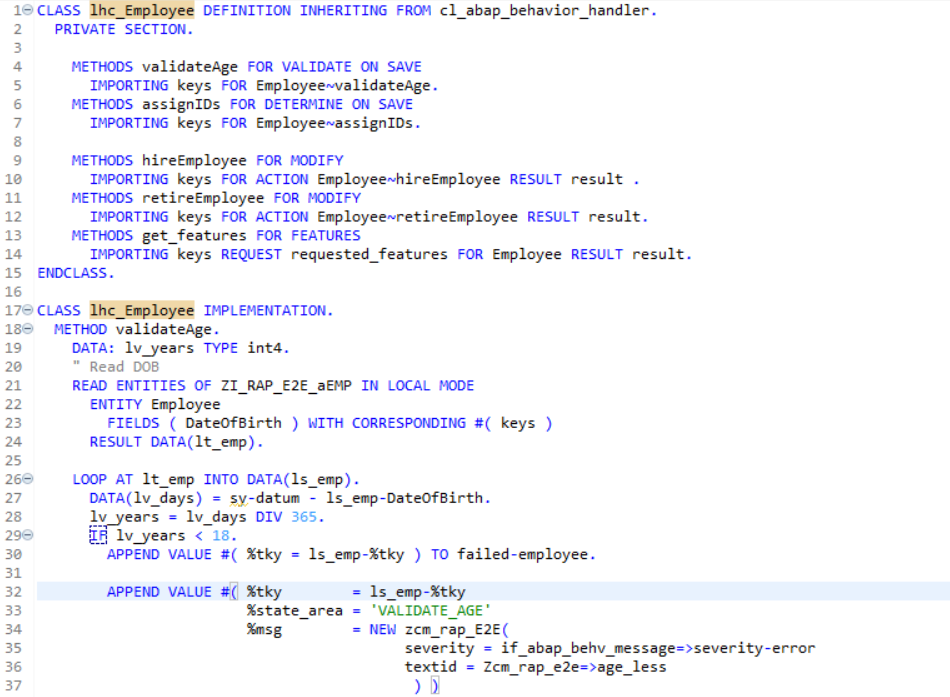
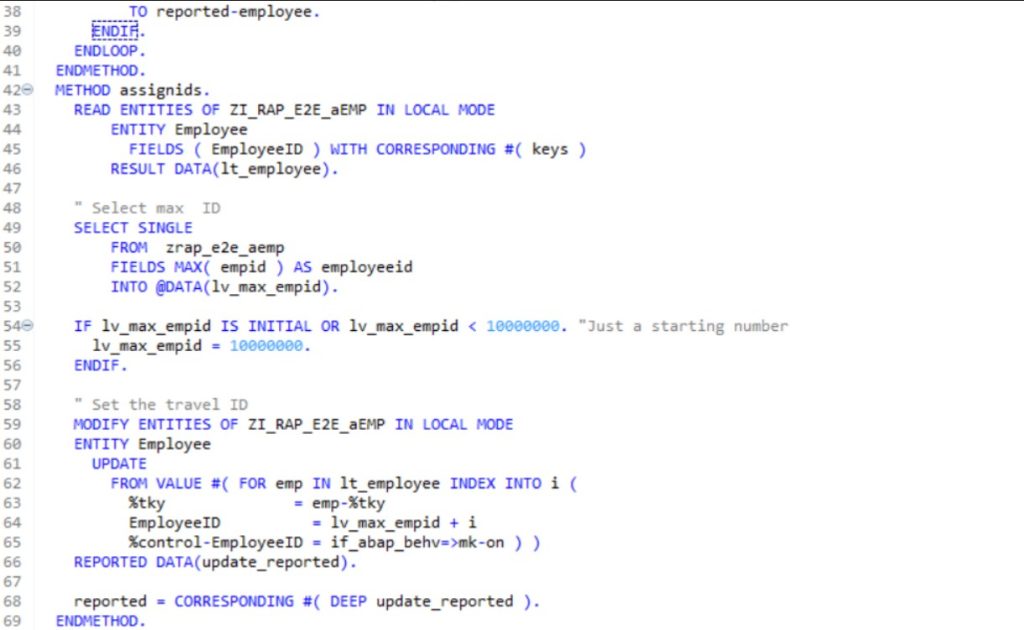
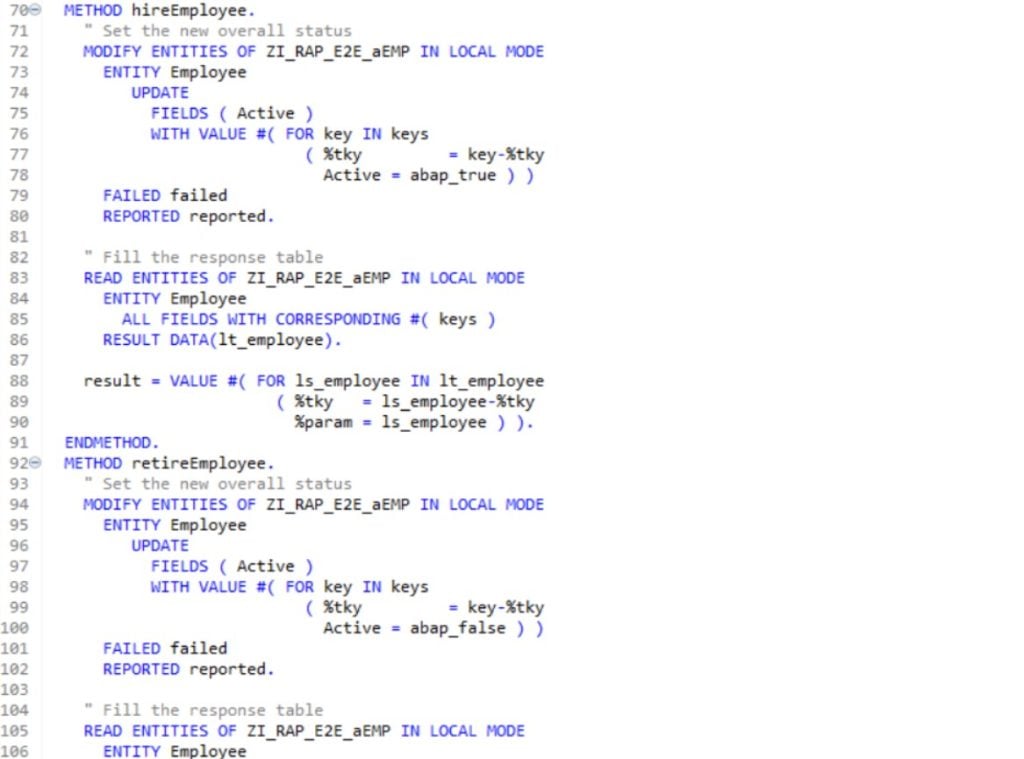
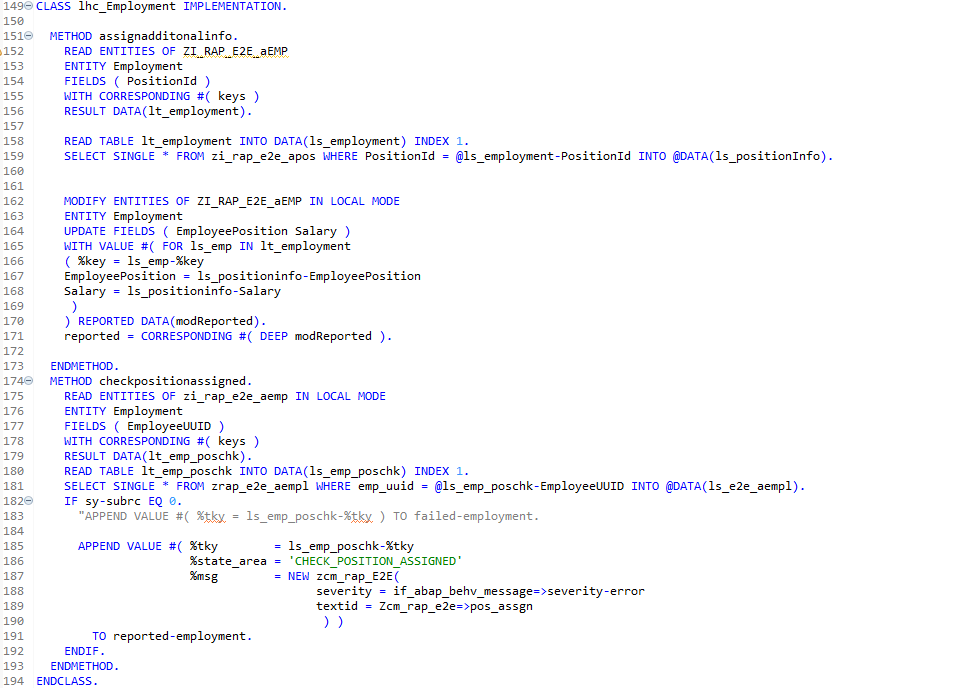
Let’s look at the business logic for child class LHC_EMPLOYEE which corresponds to the Employee entity.
LHC_EMPLOYEE
This class is created specifically for the employee Entity. It’s work is to validate an employee’s age, hire and retire an employee, and also assign ID to that employee.
Use the code provided below, but don’t activate the object.
💡 Quick Info: Entity manipulation language is used when we are dealing with determinations, validation and action. More on it here.
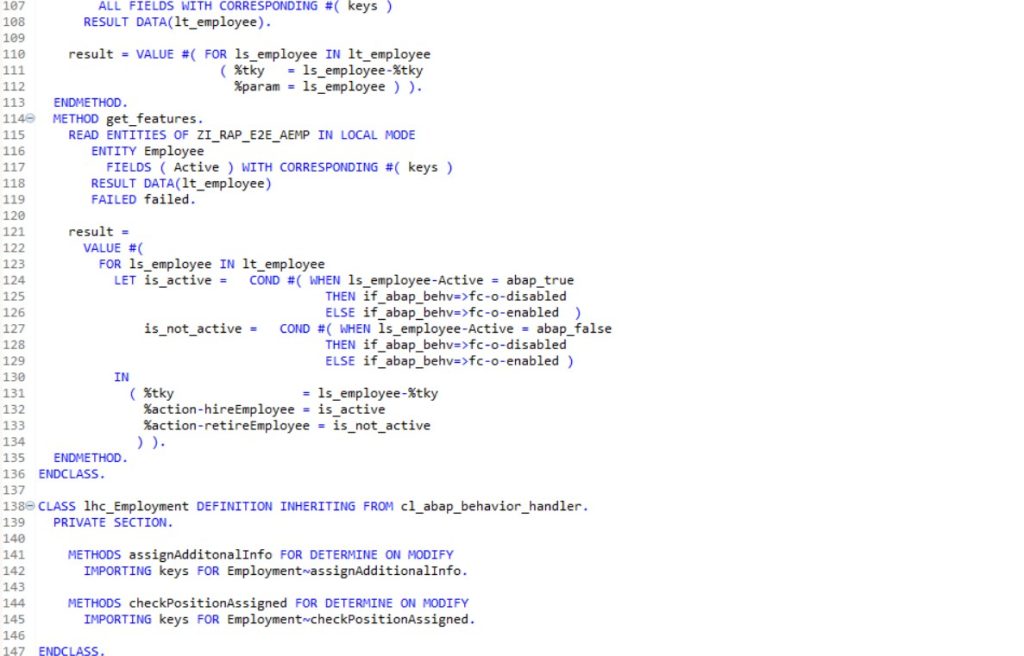
LHC_EMPLOYEMENT
Similar to employee entity, this class is created specifically for the employment Entity. It will allow us to write the business logic to check if an employee is assigned a position or not, and to assign employee with additional information.
💡 In the method checkPositionAssigned, we raise an exception message when a Position is already assigned to an employee and another position is being assigned. For this we will be creating the necessary exception class and message class in the upcoming steps. Till then, we should not activate the class.
Now that we have implemented the methods for all the business logic, we will implement additional resources which are required to raise error messages. For this we will be implementing the class ZCM_RAP_E2E and Message class ZRAP_E2E_MSG.
Message Class – ZRAP_E2E_MSG
Here we will be creating a message class to add all the message text with message ID.
To create a message class, right click your Package->New->other ABAP Repository Object->Texts->Message Class.
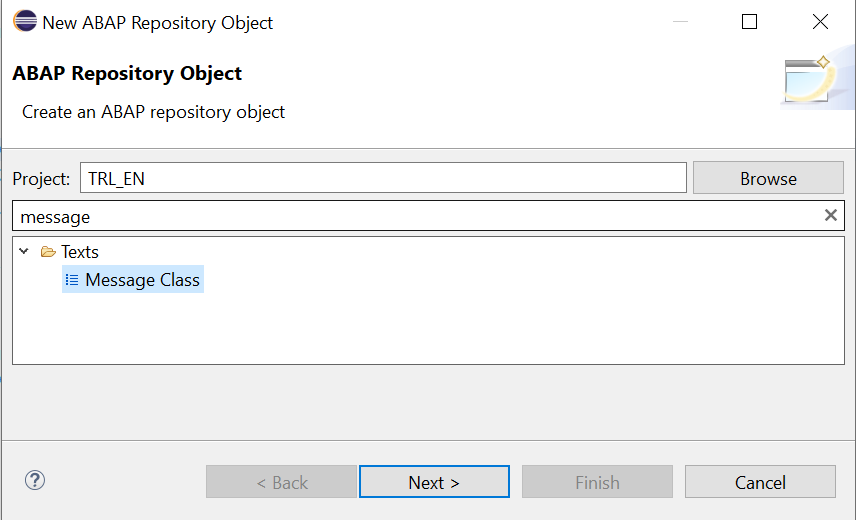
Provide message class name and description and assign a transport request and choose Finish.
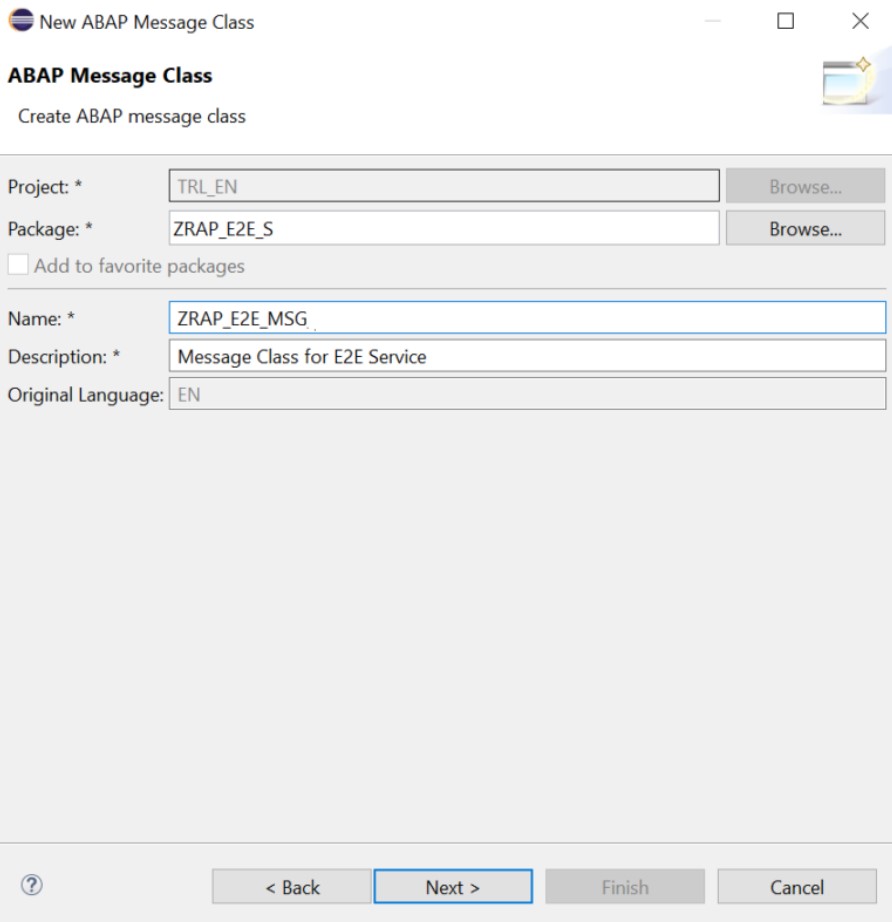
Now we have created the message class, let’s add some message text along with the message ID.

Save and activate the message class.
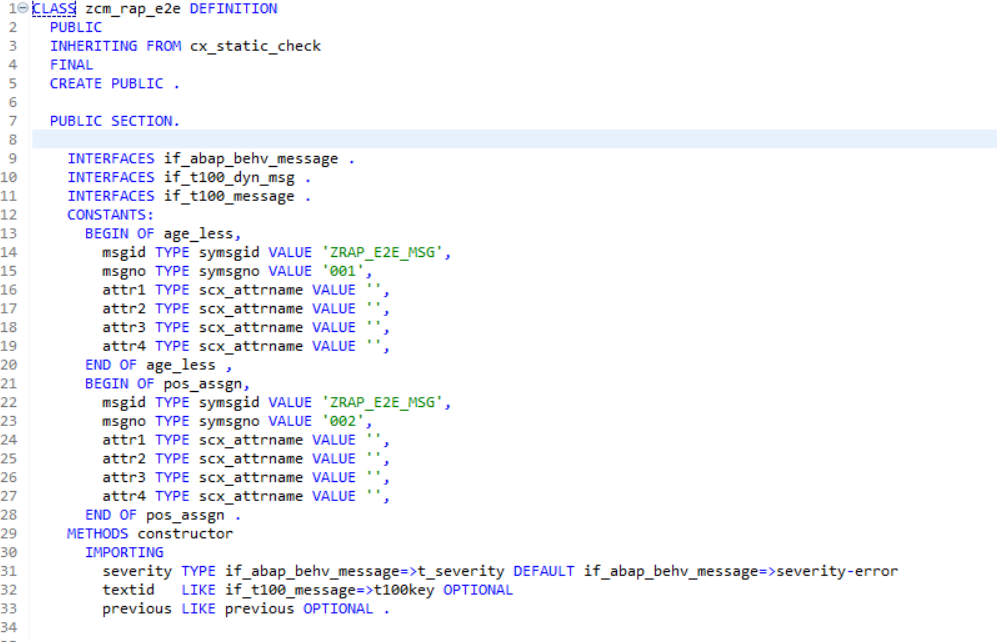
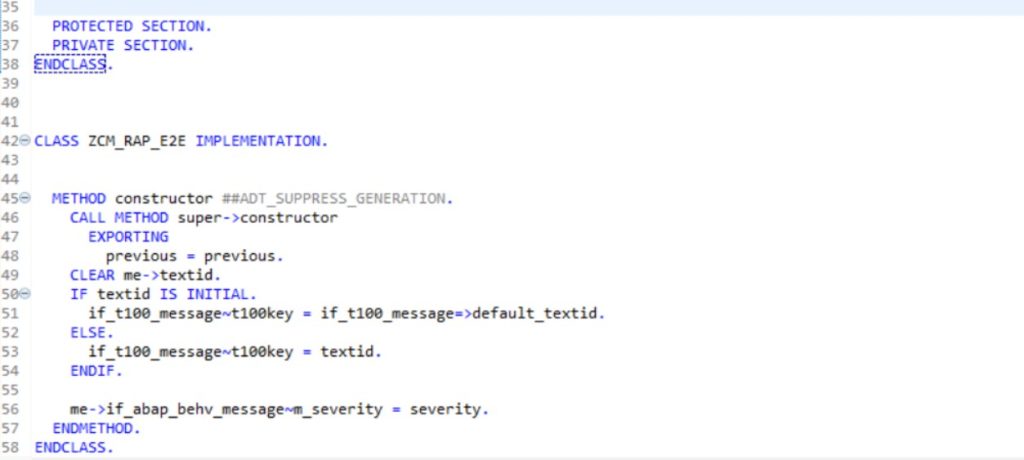
Class for Exception – ZCM_RAP_E2E
The class ZCM_RAP_E2E is added as an exception class. An Exception class is used to handle the discrepancies which occur during the execution a of program.
- To create a exception class, right click your Package->New->ABAP Class.
- Provide name and description and provide CX_STATIC_CHECK as super class and add IF_ABAP_BEHV_MESSAGE as interfaces.
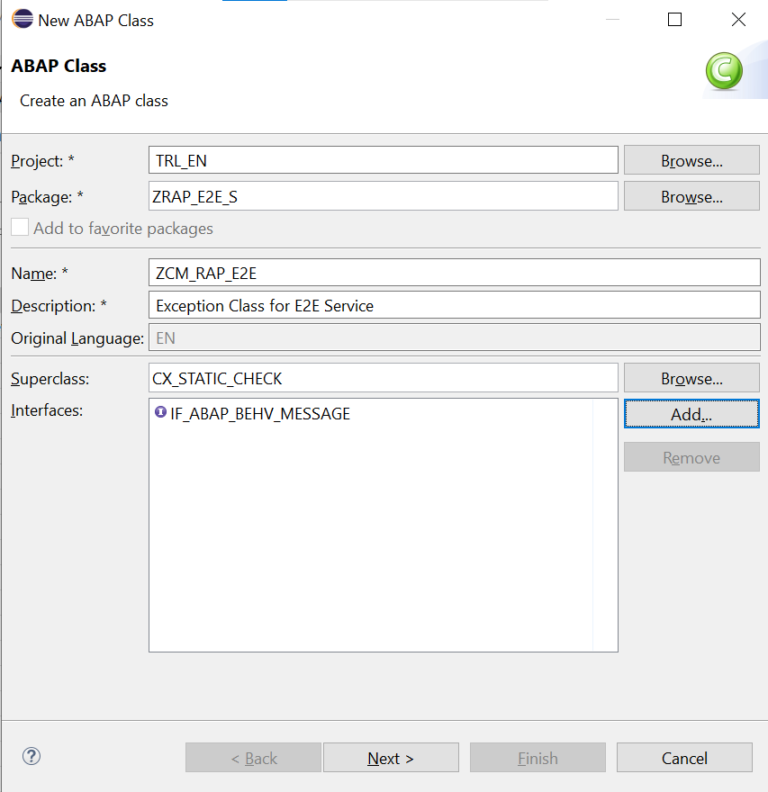
- Assign a transport request and choose Finish.
- Add the code provided below.
📢 Want to understand in more depth? – Follow our GitHub Repository
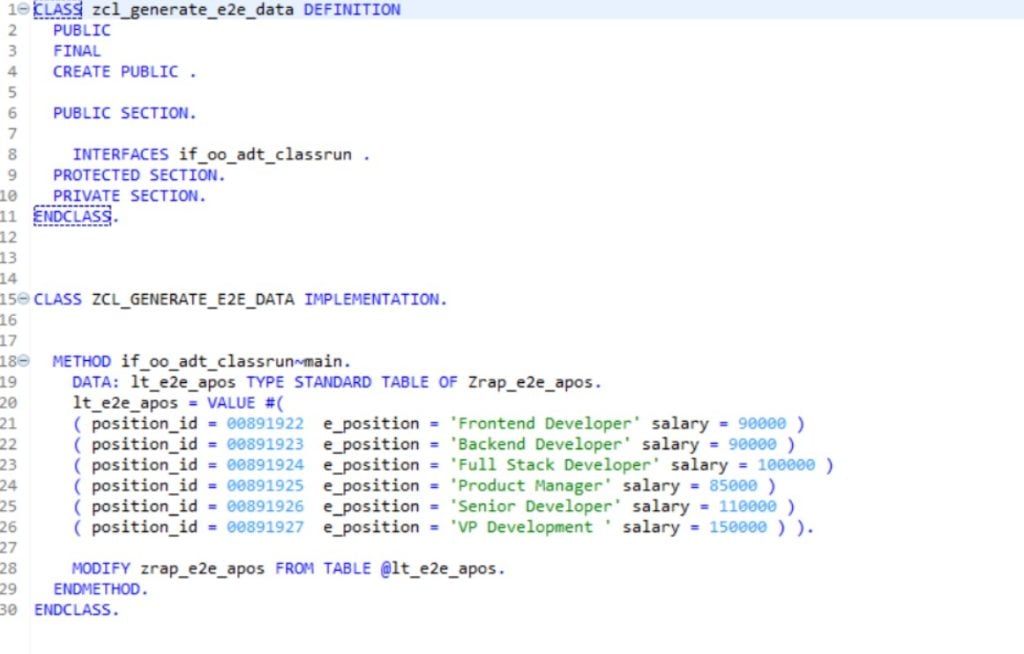
Till now everything is fine but don’t you think 🤔 we forgot to populate the Position check table which we will be using to validate the Position and add information such as Position text and salary? Let’s do that.
We will be creating a simple class ZCL_GENERATE_E2E_DATA for populating the table ZRAP_E2E_APOS.
Step 7: Creation of binding definition along with service binding for defining the entities to expose and protocol used by the service respectively. Example- OData V2 – UI, OData V2 – WebAPI etc.
🥁 Drum-roll, we are almost done, hang in there buddy.
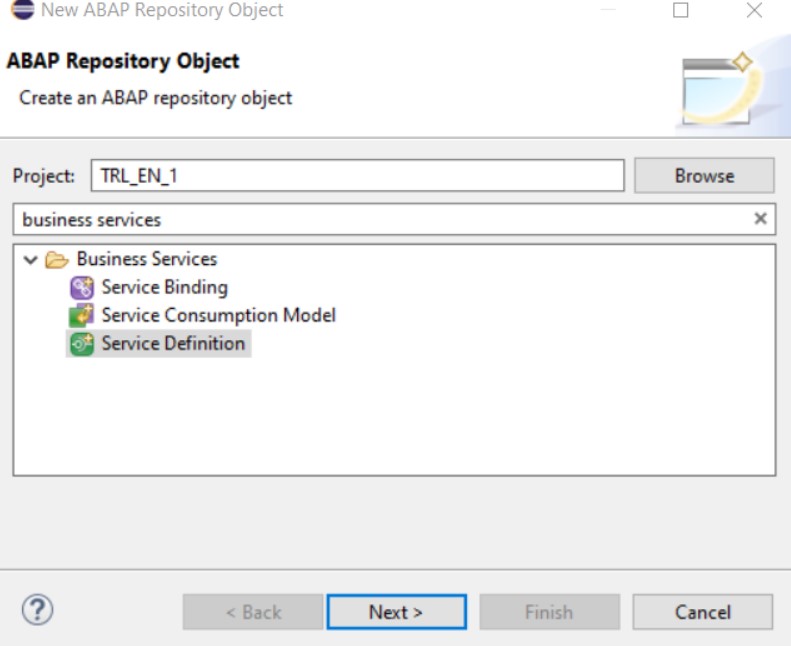
Service Definition
Service definition tells us which entity needs to be exposed. It is a projection of the data model and the related behavior to be exposed.
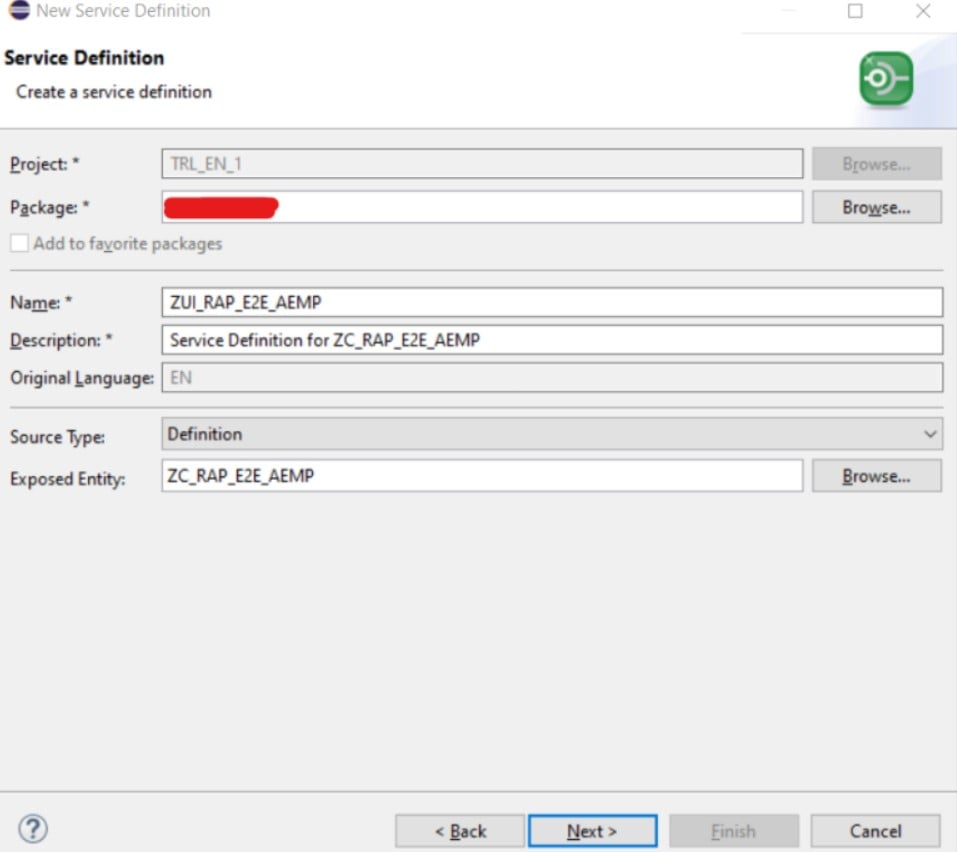
To create a service definition, right click your Package->New->other ABAP Repository Object->Business Service->Service Definition.
Provide a name and description for it and select the ‘Exposed Entity’ by clicking on ‘Browse’. Once this is done, click on Next→ Finish. Here, we are selecting the consumption view for Manager HR.
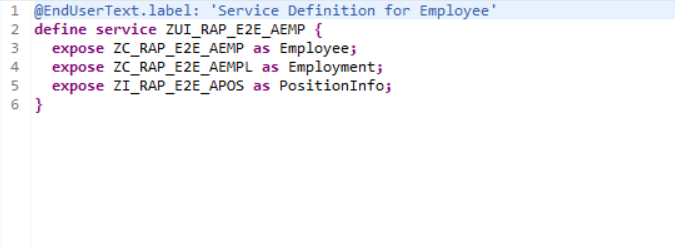
After that, enter the below code. Here, we tell the compiler about which view has to be exposed. In this case, we are talking about the interface and consumption views. These are the views needed for the HR manager scenario.
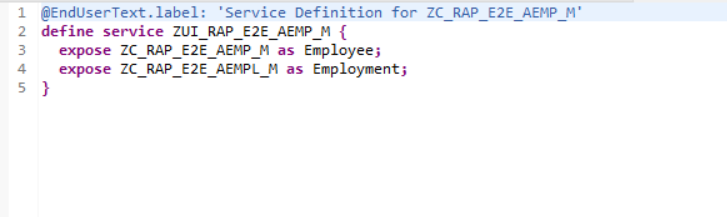
In the same way, service definition for manager can also be created.
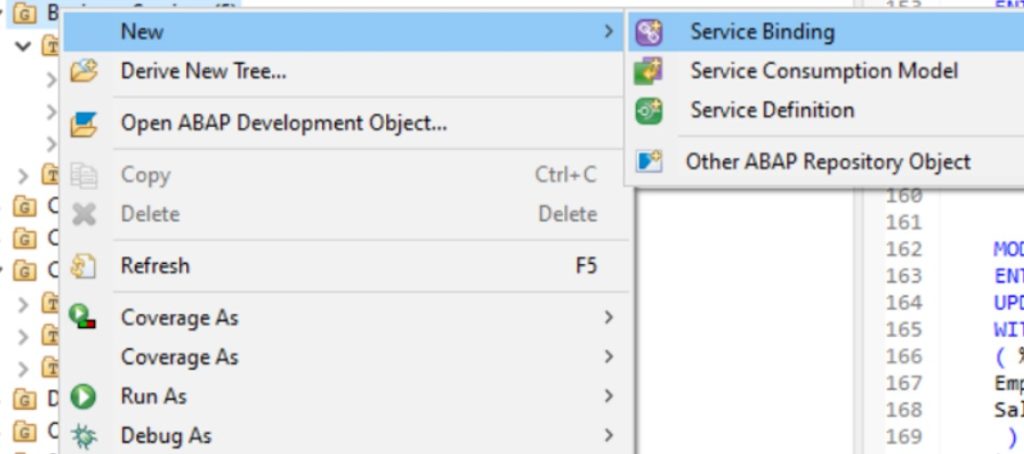
Once you’ve created the service definition, you also need to bind it and for this task, we will implement Service Binding. Service Binding is used to bind a service definition to a client-server communication protocol such as OData.
For this, right click on ‘Business Services’ folder under which you just created service definition and click on New>Service Binding.
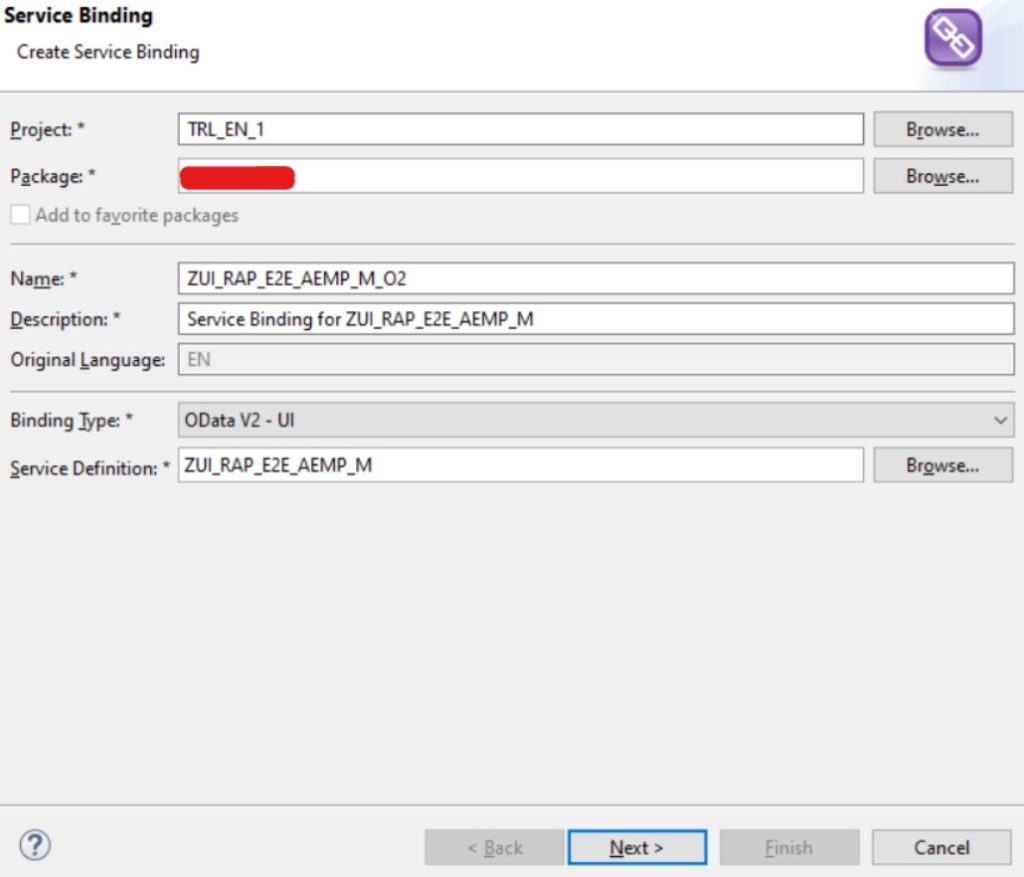
After this, provide the name and description for this service binding. The next part here is to choose the Binding Type and Service Definition for which Service Binding is being created. So, we choose ‘OData V2 – UI‘ as the binding type and since we are creating this binding for ZUI_RAP_E2E_AEMP_M service definition, hence we select the same from the ‘Browse’ option.
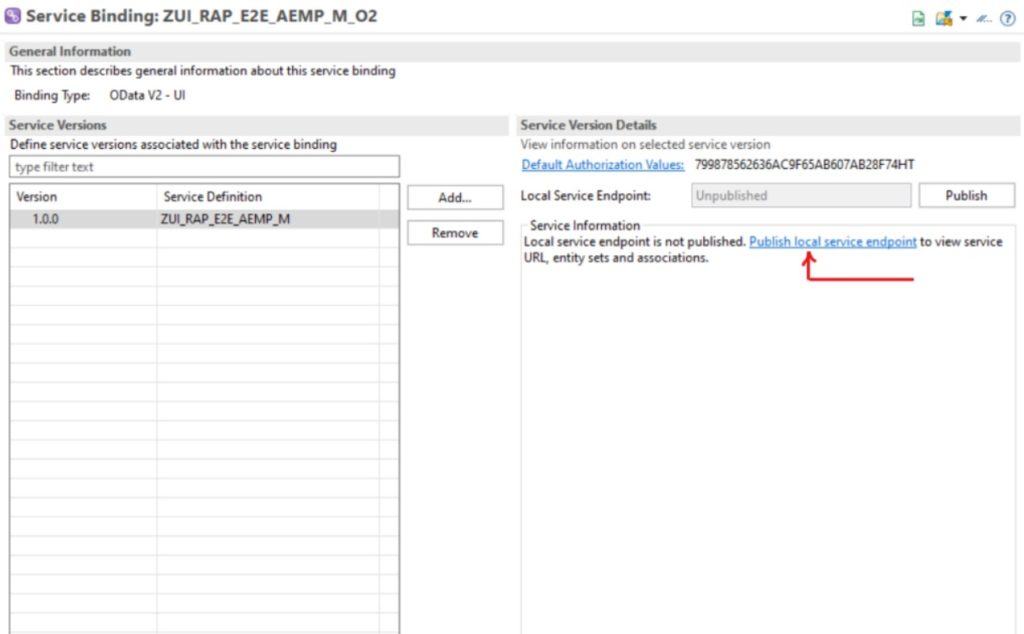
Click on Next and choose the appropriate transport request and click on Finish. You will see a screen stating that the Service Binding is made.

Step 8: Publish the service
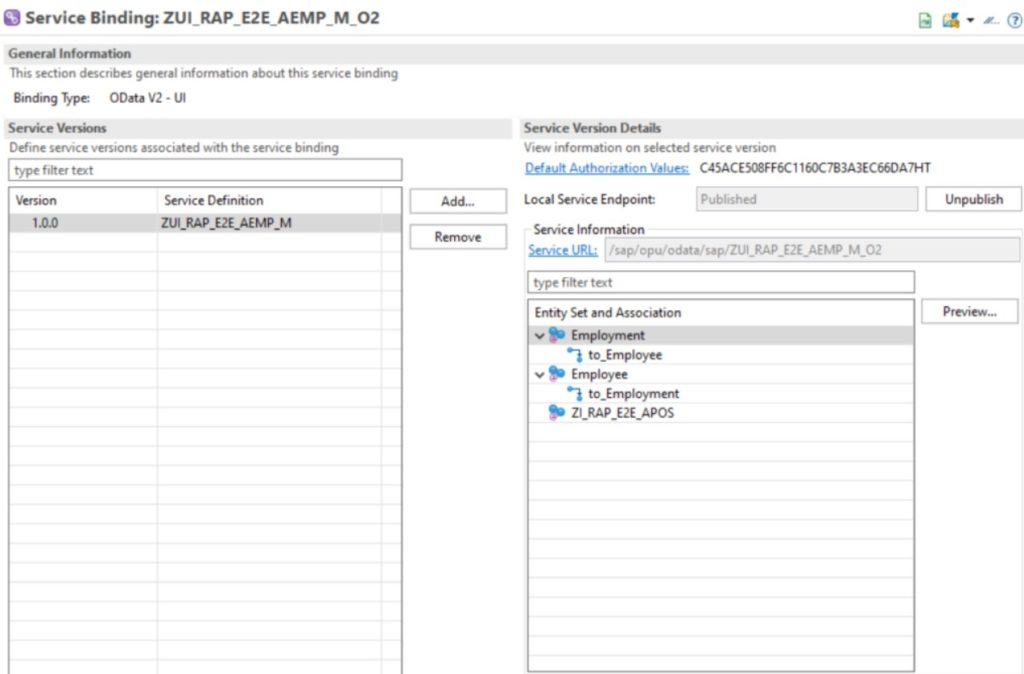
Now you need to activate it and then click on ‘Publish local service endpoint’ to publish it. This will allow you to see the preview of the OData V2 – UI service in the form of a fiori UI.
After it is published, you will be able to see its components and by selecting the component and clicking on ‘Preview’, you’ll be taken to the UI for that selected element.
Likewise, you need to create one more service binding for the HR service. If you don’t feel confident enough to create it, then you can always go and visit our GitHub repository for the same. Here is the link.
The final outcome
As you know, in our scenario we hard coded the UI access, permissions and display for HR and HR Manager separately, so following are the final screen previews for both of them!!
HR
HR Manager
With this, we come to the end of our blog series. We have completed all the steps of our solution for the hiring scenario. In this blog post, we implemented last three steps wherein we first created the behavior implementation for business logic, then binding definition followed by binding services. Finally, for the last step we published all the created services and viewed the working of each UI service we published.
We hope that you have a better understanding of ABAP RAP and it’s application. So, why to stop here, go out and create more such applications with capabilities such as draft handling, Multi-Inline-Edit and what not. Follow the link to SAP help for more learning.
It’s time for us to say goodbye. It’s been a fun and interesting journey. We’ll be back with more posts on different topics soon. Till then, goodbye and happy learning!